How to use smart slider 3 in wordpress
The Coding Bus
via YouTube https://youtu.be/ZWBP5W2N3aU
Sunday, 27 October 2019
Liked on YouTube: How to use smart slider 3 in wordpress
How to use smart slider 3 in wordpress
The Coding Bus
via YouTube https://youtu.be/ZWBP5W2N3aU
The Coding Bus
via YouTube https://youtu.be/ZWBP5W2N3aU
How to use smart slider 3 in wordpress
How to use smart slider 3 in wordpress
Watch on YouTube here: How to use smart slider 3 in wordpress
Via https://www.youtube.com/channel/UCcZImr64sN4bR4BB_JA82vg/videos
Watch on YouTube here: How to use smart slider 3 in wordpress
Via https://www.youtube.com/channel/UCcZImr64sN4bR4BB_JA82vg/videos
Thursday, 17 October 2019
Full Setup of Rank Math SEO Plugin | Increase SEO Score of Post
Full Setup of Rank Math SEO Plugin | Increase SEO Score of Post
Full Setup of Rank Math SEO Plugin | Increase SEO Score of Post. Hello Guys... In this tutorial, we are going to learn how to set up Rank Math SEO Plugin in WordPress website. So here we go... If you already installed Rank Math but want to go through the setup wizard again, you can find out how to open the Rank Math setup wizard. ... Step 1 – Import Data. ... Step 2 – Selecting Your Website Type. ... Step 3 – Google Search Console. ... Step 4 – Sitemaps. ... Step 5 – Optimization. ... Step 6 – Completing the Setup. how to setup rank math seo, seo, wordpress seo, rank math, rank math seo plugin, wordpress seo plugin, wordpress plugins, wordpress, yoast seo, search engine optimization, rank math review, rank math seo, best wordpress seo plugin, rankmath, seo plugin for wordpress, seo plugin wordpress, seo optimization, google keyword ranking, seo plugin, rank math seo plugin review, free seo plugin for wordpress, wordpress seo optimization, free seo plugin, wordpress plugins for seo, wordpress seo plugin free, digital marketing, 2019, best seo plugin wordpress, hindi, rank math seo plugin setup, rank math seo plugin hindi, wordpress seo tutorial, rank math plugin, seo tutorial, best seo plugin for woocommerce, best free seo plugin for wordpress 2019, yoast seo plugin, yoast seo plugin in wordpress, wordpress seo yoast, seo plugin by yoast, seo yoast plugin wordpress, wordpress seo by yoast, wordpress seo plugin yoast, wordpress tags for seo, seo plugin for blogger, kevin lehner, rank 1 in google, how to rank #1 on google, google ranking, how to rank on google, seo website, seo ranking, keyword ranking, website ranking, seo training, how to rank website on google first page, blogging, rank math tutorial, youtube seo, online marketing, internet marketing, yoast, google seo, wordpress tutorial, rank math vs yoast, #rank math seo plugin, #rankmathseoplugin, rank math vs yoast seo, rank math or yoast, #rankmathseo, #seoplugi, #allhindimehelp, rank math seo tutorial, wp seo structured data schema, wp seo plugin, sitemap generator, sitemap xml, wordpress title tag, wordpress image seo, wordpress image seo plugin, wordpress seo 2018, how to use yoast seo plugin, yoast seo tutorial 2018, yoast wordpress seo plugin, wordpress seo tips, wordpress all in one seo plugin tutorial, best wordpress seo plugins compared, wordpress seo plugins compared, yoast vs seo framework, yoast vs all in one seo, yoast premium vs free, yoast vs squirrly, yoast vs the seo framework, wpcrafter, new rank math seo plugin for wordpress maximize your website, how to seo wordpress site, seo in urdu, #ikashif khan, kashi, why i quit rank math seo plugin for wordpress, seo plugin in wordpress, wordpress theme for seo, blogs, rankmatk seo, rankmath tutorial, wordpress seo for beginners, rankmath vs yoast, plugin de seo, melhor plugin de seo para wordpress, seo para wordpress, plugin de seo local search, rich snippet seo, rank math - melhor plugin de seo wordpress, https://rankmath.com, seo strategy, seo implementation, seo in hindi, seo hindi, seo hindi 2019, seo tutorial for beginners in hindi 2019, seo tutorials in hindi, free digital marketing, 404 page not found, 404 page not found in wordpress, 404 page not found the page you requested was not found, 404 page not found error, 404 page not found solution, 404 page not found meaning, fix 404 errors, fix 404 error page not found, 404 errors in google search console, 404 errors wordpress, 404 errors google analytics, fix 404 errors in google webmaster tools, fix 404 page not found wordpress, page not found 404 error, page not found error 404, enable breadcrumbs wordpress, rank math wordpress seo settings, display breadcrumbs in wordpress, breadcrumbs settings, breadcrumbs seo benefit, how to create breadcrumbs in wordpress, how to add breadcrumbs in wordpress, breadcrumbs in wordpress, wordpress breadcrumbs, wordpress breadcrumb plugin, breadcrumb plugin, breadcrumbs tutorial, breadcrumbs wordpress, how to add breadcrumbs, breadcrumb for wordpress, how to add breadcrumbs to your wordpress website, wordpress plugins 2019, best seo plugin for beginners, rank math seo plugin details, rank easily on google, seo settings for beginners, seo for everyone, technical yogi, keyword planner for youtube, keyword research, how to increase youtube views, high cpc keywords, how to find best keyword for youtube, increase youtube traffic, increase youtube revenue, how to use google keyword planner, best youtube keyword research tool, best youtube keyword tags, blog, content marketing, social media marketing, xml sitemap, top wordpress plugins, important wordpress plugins, important wordpress plugin, best wordpress plugin, most important wordpress plugin, top wordpress seo plugins, seo plugins, best wordpress seo plugins, best seo plugins, wordpress sitemaps, patel
via YouTube https://youtu.be/sQlvRAE7NLw
Liked on YouTube: Full Setup of Rank Math SEO Plugin | Increase SEO Score of Post
Full Setup of Rank Math SEO Plugin | Increase SEO Score of Post
Full Setup of Rank Math SEO Plugin | Increase SEO Score of Post. Hello Guys... In this tutorial, we are going to learn how to set up Rank Math SEO Plugin in WordPress website. So here we go... If you already installed Rank Math but want to go through the setup wizard again, you can find out how to open the Rank Math setup wizard. ... Step 1 – Import Data. ... Step 2 – Selecting Your Website Type. ... Step 3 – Google Search Console. ... Step 4 – Sitemaps. ... Step 5 – Optimization. ... Step 6 – Completing the Setup. how to setup rank math seo, seo, wordpress seo, rank math, rank math seo plugin, wordpress seo plugin, wordpress plugins, wordpress, yoast seo, search engine optimization, rank math review, rank math seo, best wordpress seo plugin, rankmath, seo plugin for wordpress, seo plugin wordpress, seo optimization, google keyword ranking, seo plugin, rank math seo plugin review, free seo plugin for wordpress, wordpress seo optimization, free seo plugin, wordpress plugins for seo, wordpress seo plugin free, digital marketing, 2019, best seo plugin wordpress, hindi, rank math seo plugin setup, rank math seo plugin hindi, wordpress seo tutorial, rank math plugin, seo tutorial, best seo plugin for woocommerce, best free seo plugin for wordpress 2019, yoast seo plugin, yoast seo plugin in wordpress, wordpress seo yoast, seo plugin by yoast, seo yoast plugin wordpress, wordpress seo by yoast, wordpress seo plugin yoast, wordpress tags for seo, seo plugin for blogger, kevin lehner, rank 1 in google, how to rank #1 on google, google ranking, how to rank on google, seo website, seo ranking, keyword ranking, website ranking, seo training, how to rank website on google first page, blogging, rank math tutorial, youtube seo, online marketing, internet marketing, yoast, google seo, wordpress tutorial, rank math vs yoast, #rank math seo plugin, #rankmathseoplugin, rank math vs yoast seo, rank math or yoast, #rankmathseo, #seoplugi, #allhindimehelp, rank math seo tutorial, wp seo structured data schema, wp seo plugin, sitemap generator, sitemap xml, wordpress title tag, wordpress image seo, wordpress image seo plugin, wordpress seo 2018, how to use yoast seo plugin, yoast seo tutorial 2018, yoast wordpress seo plugin, wordpress seo tips, wordpress all in one seo plugin tutorial, best wordpress seo plugins compared, wordpress seo plugins compared, yoast vs seo framework, yoast vs all in one seo, yoast premium vs free, yoast vs squirrly, yoast vs the seo framework, wpcrafter, new rank math seo plugin for wordpress maximize your website, how to seo wordpress site, seo in urdu, #ikashif khan, kashi, why i quit rank math seo plugin for wordpress, seo plugin in wordpress, wordpress theme for seo, blogs, rankmatk seo, rankmath tutorial, wordpress seo for beginners, rankmath vs yoast, plugin de seo, melhor plugin de seo para wordpress, seo para wordpress, plugin de seo local search, rich snippet seo, rank math - melhor plugin de seo wordpress, https://rankmath.com, seo strategy, seo implementation, seo in hindi, seo hindi, seo hindi 2019, seo tutorial for beginners in hindi 2019, seo tutorials in hindi, free digital marketing, 404 page not found, 404 page not found in wordpress, 404 page not found the page you requested was not found, 404 page not found error, 404 page not found solution, 404 page not found meaning, fix 404 errors, fix 404 error page not found, 404 errors in google search console, 404 errors wordpress, 404 errors google analytics, fix 404 errors in google webmaster tools, fix 404 page not found wordpress, page not found 404 error, page not found error 404, enable breadcrumbs wordpress, rank math wordpress seo settings, display breadcrumbs in wordpress, breadcrumbs settings, breadcrumbs seo benefit, how to create breadcrumbs in wordpress, how to add breadcrumbs in wordpress, breadcrumbs in wordpress, wordpress breadcrumbs, wordpress breadcrumb plugin, breadcrumb plugin, breadcrumbs tutorial, breadcrumbs wordpress, how to add breadcrumbs, breadcrumb for wordpress, how to add breadcrumbs to your wordpress website, wordpress plugins 2019, best seo plugin for beginners, rank math seo plugin details, rank easily on google, seo settings for beginners, seo for everyone, technical yogi, keyword planner for youtube, keyword research, how to increase youtube views, high cpc keywords, how to find best keyword for youtube, increase youtube traffic, increase youtube revenue, how to use google keyword planner, best youtube keyword research tool, best youtube keyword tags, blog, content marketing, social media marketing, xml sitemap, top wordpress plugins, important wordpress plugins, important wordpress plugin, best wordpress plugin, most important wordpress plugin, top wordpress seo plugins, seo plugins, best wordpress seo plugins, best seo plugins, wordpress sitemaps, patel
via YouTube https://youtu.be/sQlvRAE7NLw
Full Setup of Rank Math SEO Plugin | Increase SEO Score of Post. Hello Guys... In this tutorial, we are going to learn how to set up Rank Math SEO Plugin in WordPress website. So here we go... If you already installed Rank Math but want to go through the setup wizard again, you can find out how to open the Rank Math setup wizard. ... Step 1 – Import Data. ... Step 2 – Selecting Your Website Type. ... Step 3 – Google Search Console. ... Step 4 – Sitemaps. ... Step 5 – Optimization. ... Step 6 – Completing the Setup. how to setup rank math seo, seo, wordpress seo, rank math, rank math seo plugin, wordpress seo plugin, wordpress plugins, wordpress, yoast seo, search engine optimization, rank math review, rank math seo, best wordpress seo plugin, rankmath, seo plugin for wordpress, seo plugin wordpress, seo optimization, google keyword ranking, seo plugin, rank math seo plugin review, free seo plugin for wordpress, wordpress seo optimization, free seo plugin, wordpress plugins for seo, wordpress seo plugin free, digital marketing, 2019, best seo plugin wordpress, hindi, rank math seo plugin setup, rank math seo plugin hindi, wordpress seo tutorial, rank math plugin, seo tutorial, best seo plugin for woocommerce, best free seo plugin for wordpress 2019, yoast seo plugin, yoast seo plugin in wordpress, wordpress seo yoast, seo plugin by yoast, seo yoast plugin wordpress, wordpress seo by yoast, wordpress seo plugin yoast, wordpress tags for seo, seo plugin for blogger, kevin lehner, rank 1 in google, how to rank #1 on google, google ranking, how to rank on google, seo website, seo ranking, keyword ranking, website ranking, seo training, how to rank website on google first page, blogging, rank math tutorial, youtube seo, online marketing, internet marketing, yoast, google seo, wordpress tutorial, rank math vs yoast, #rank math seo plugin, #rankmathseoplugin, rank math vs yoast seo, rank math or yoast, #rankmathseo, #seoplugi, #allhindimehelp, rank math seo tutorial, wp seo structured data schema, wp seo plugin, sitemap generator, sitemap xml, wordpress title tag, wordpress image seo, wordpress image seo plugin, wordpress seo 2018, how to use yoast seo plugin, yoast seo tutorial 2018, yoast wordpress seo plugin, wordpress seo tips, wordpress all in one seo plugin tutorial, best wordpress seo plugins compared, wordpress seo plugins compared, yoast vs seo framework, yoast vs all in one seo, yoast premium vs free, yoast vs squirrly, yoast vs the seo framework, wpcrafter, new rank math seo plugin for wordpress maximize your website, how to seo wordpress site, seo in urdu, #ikashif khan, kashi, why i quit rank math seo plugin for wordpress, seo plugin in wordpress, wordpress theme for seo, blogs, rankmatk seo, rankmath tutorial, wordpress seo for beginners, rankmath vs yoast, plugin de seo, melhor plugin de seo para wordpress, seo para wordpress, plugin de seo local search, rich snippet seo, rank math - melhor plugin de seo wordpress, https://rankmath.com, seo strategy, seo implementation, seo in hindi, seo hindi, seo hindi 2019, seo tutorial for beginners in hindi 2019, seo tutorials in hindi, free digital marketing, 404 page not found, 404 page not found in wordpress, 404 page not found the page you requested was not found, 404 page not found error, 404 page not found solution, 404 page not found meaning, fix 404 errors, fix 404 error page not found, 404 errors in google search console, 404 errors wordpress, 404 errors google analytics, fix 404 errors in google webmaster tools, fix 404 page not found wordpress, page not found 404 error, page not found error 404, enable breadcrumbs wordpress, rank math wordpress seo settings, display breadcrumbs in wordpress, breadcrumbs settings, breadcrumbs seo benefit, how to create breadcrumbs in wordpress, how to add breadcrumbs in wordpress, breadcrumbs in wordpress, wordpress breadcrumbs, wordpress breadcrumb plugin, breadcrumb plugin, breadcrumbs tutorial, breadcrumbs wordpress, how to add breadcrumbs, breadcrumb for wordpress, how to add breadcrumbs to your wordpress website, wordpress plugins 2019, best seo plugin for beginners, rank math seo plugin details, rank easily on google, seo settings for beginners, seo for everyone, technical yogi, keyword planner for youtube, keyword research, how to increase youtube views, high cpc keywords, how to find best keyword for youtube, increase youtube traffic, increase youtube revenue, how to use google keyword planner, best youtube keyword research tool, best youtube keyword tags, blog, content marketing, social media marketing, xml sitemap, top wordpress plugins, important wordpress plugins, important wordpress plugin, best wordpress plugin, most important wordpress plugin, top wordpress seo plugins, seo plugins, best wordpress seo plugins, best seo plugins, wordpress sitemaps, patel
via YouTube https://youtu.be/sQlvRAE7NLw
Full Setup of Rank Math SEO Plugin | Increase SEO Score of Post
Full Setup of Rank Math SEO Plugin | Increase SEO Score of Post
Watch on YouTube here: Full Setup of Rank Math SEO Plugin | Increase SEO Score of Post
Via https://www.youtube.com/channel/UCcZImr64sN4bR4BB_JA82vg/videos
Watch on YouTube here: Full Setup of Rank Math SEO Plugin | Increase SEO Score of Post
Via https://www.youtube.com/channel/UCcZImr64sN4bR4BB_JA82vg/videos
How to Setup Rank Math SEO Plugin in 2019
How to Setup Rank Math
 Rank Math is free to use, but you need to activate it to access all its features—which uses a FREE Rank Math account. Activating Rank Math also helps us associate each copy with an email address, which is helpful if you need any support.
Use this link to head over to Rank Math’s website and create an account. The link is also present on the activation page, and clicking it will open Rank Math’s website on a new tab.
Rank Math is free to use, but you need to activate it to access all its features—which uses a FREE Rank Math account. Activating Rank Math also helps us associate each copy with an email address, which is helpful if you need any support.
Use this link to head over to Rank Math’s website and create an account. The link is also present on the activation page, and clicking it will open Rank Math’s website on a new tab.
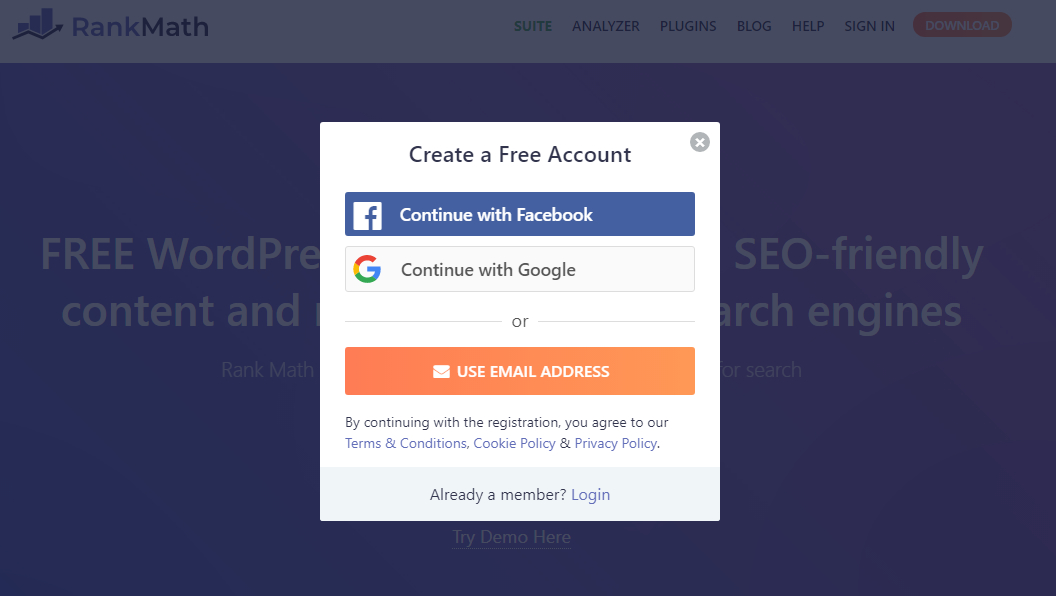 You can use a Google or Facebook account to create a Rank Math account or use your email ID. Sign up using your preferred method, but keep a copy of your credentials handy to activate Rank Math. Note that if you sign up using your social account, then your credentials will be sent by email. You can, and are encouraged to change your password once your account has been created. You can do that easily inside your Rank Math account.
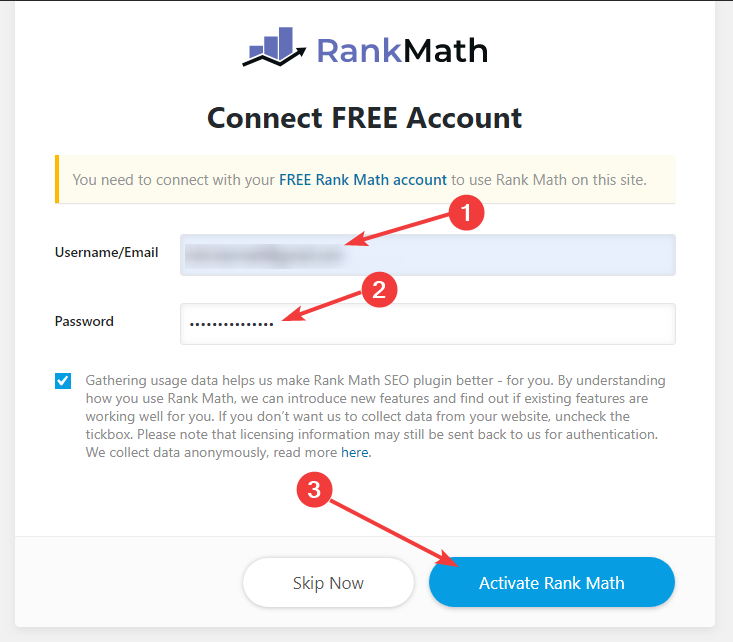
Enter your credentials on Rank Math’s activation screen, and click the “Activate Rank Math” button.
You can use a Google or Facebook account to create a Rank Math account or use your email ID. Sign up using your preferred method, but keep a copy of your credentials handy to activate Rank Math. Note that if you sign up using your social account, then your credentials will be sent by email. You can, and are encouraged to change your password once your account has been created. You can do that easily inside your Rank Math account.
Enter your credentials on Rank Math’s activation screen, and click the “Activate Rank Math” button.
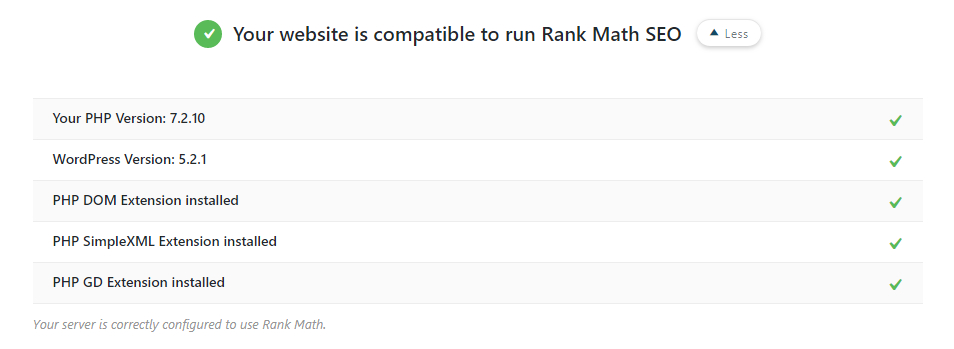
 The next step is the setup screen. Here Rank Math conducts a compatibility check to see if your website is compatible with Rank Math and also shares the other steps that will be taken during the setup process.
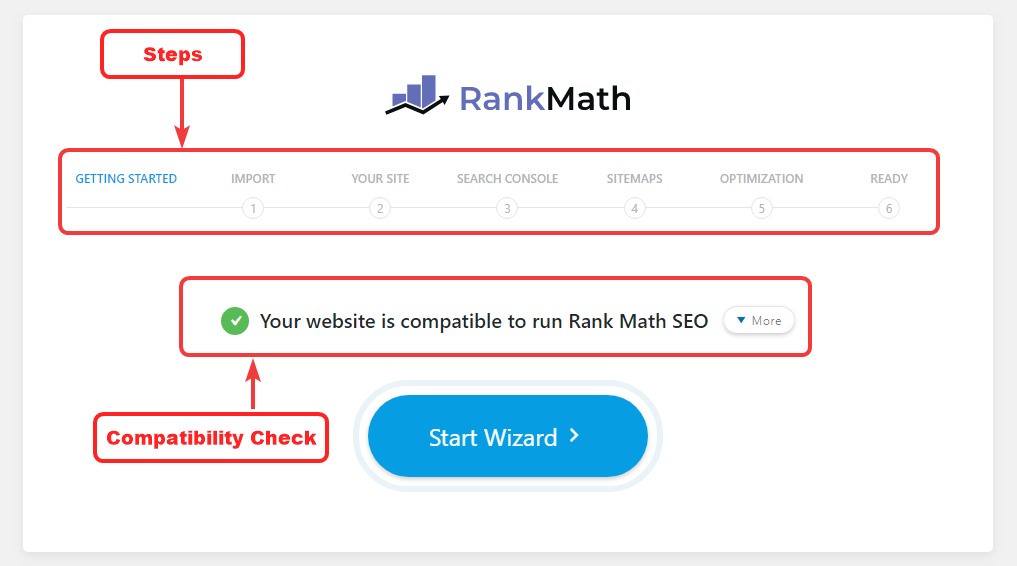 You can click the “More” button to see all the tests that were performed and resolve the errors if any show up. Here is a glimpse of all the tests that Rank Math Performs.
 Once you’re ready, click the blinking “Start Wizard” button to continue the setup process.
If you haven’t installed Rank Math yet, then we would recommend that you first do so by following this guide.
Once you’ve installed Rank Math, you’ll be greeted by the Setup Wizard. We’ve designed the setup wizard to help you setup Rank Math in the best way possible based on your website and requirements.
If you installed Rank Math earlier but skipped the setup wizard for some reason, follow the instructions in this guide to initiate the setup process once again.
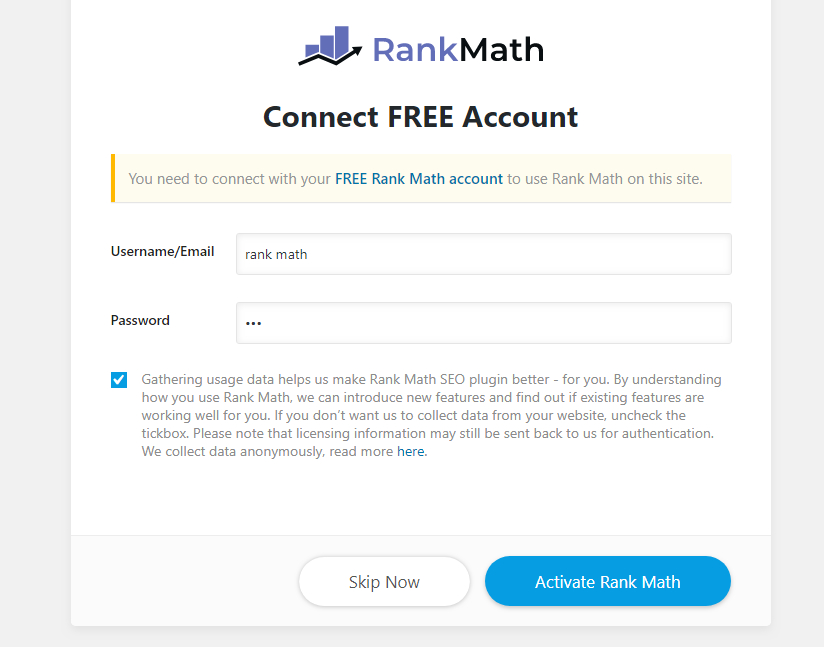
Once the setup process begins, you will be greeted by the activation screen.
Rank Math is free to use, but you need to activate it to access all its features—which uses a FREE Rank Math account. Activating Rank Math also helps us associate each copy with an email address, which is helpful if you need any support.
Use this link to head over to Rank Math’s website and create an account. The link is also present on the activation page, and clicking it will open Rank Math’s website on a new tab.
You can use a Google or Facebook account to create a Rank Math account or use your email ID. Sign up using your preferred method, but keep a copy of your credentials handy to activate Rank Math. Note that if you sign up using your social account, then your credentials will be sent by email. You can, and are encouraged to change your password once your account has been created. You can do that easily inside your Rank Math account.
Enter your credentials on Rank Math’s activation screen, and click the “Activate Rank Math” button.
The next step is the setup screen. Here Rank Math conducts a compatibility check to see if your website is compatible with Rank Math and also shares the other steps that will be taken during the setup process.
You can click the “More” button to see all the tests that were performed and resolve the errors if any show up. Here is a glimpse of all the tests that Rank Math Performs.
Once you’re ready, click the blinking “Start Wizard” button to continue the setup process.
Table of Contents
Step 1 – Import Data From Other Plugins
Rank math can import SEO settings from many SEO plugins. This makes the transition to Rank Math from any SEO plugin seamless, and the change won’t affect your SEO rankings any all.
Rank Math will automatically detect which SEO plugin you’re using and allow you to selectively choose which settings you can import. For example, here is how the Import Data screen appears when your site is set up using Yoast SEO.
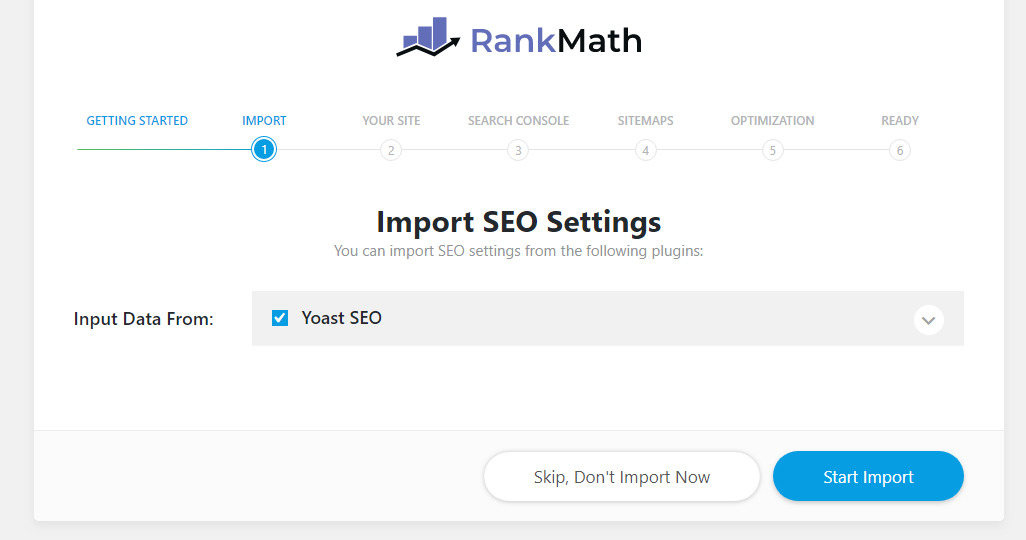 You have the ability to customize the import process by importing only selected data from your existing SEO plugin. To check which data will be imported, click the drop-down button on the edge of the Import Data field.
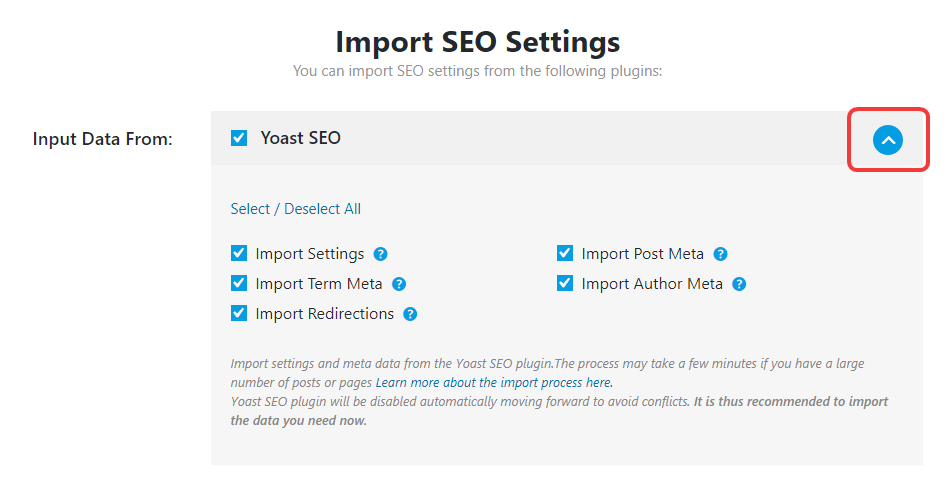 You can select or de-select the data you want to import or not imported. But, a fair bit of warning. **Once the import process begins, the other SEO plugin that you’re using will be disabled (to avoid conflicts), and if you don’t import some of the data, it may be lost forever. That is why we recommend that you select all the data to import. ** It will make the transition smoother.
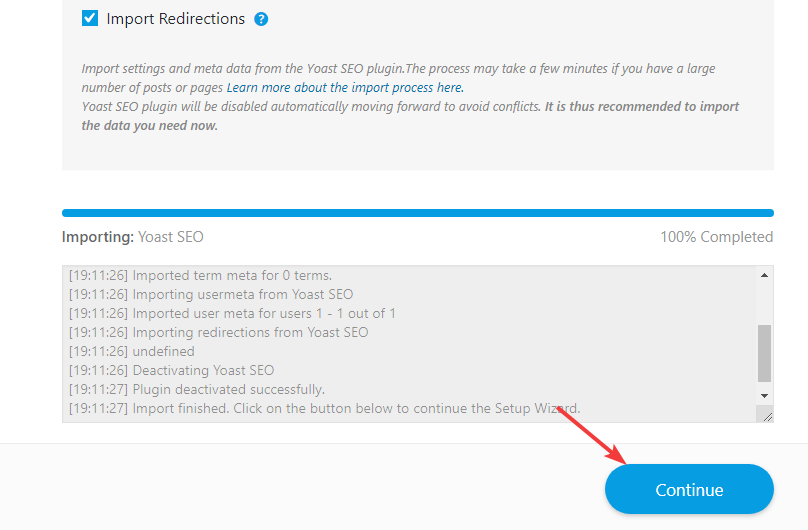
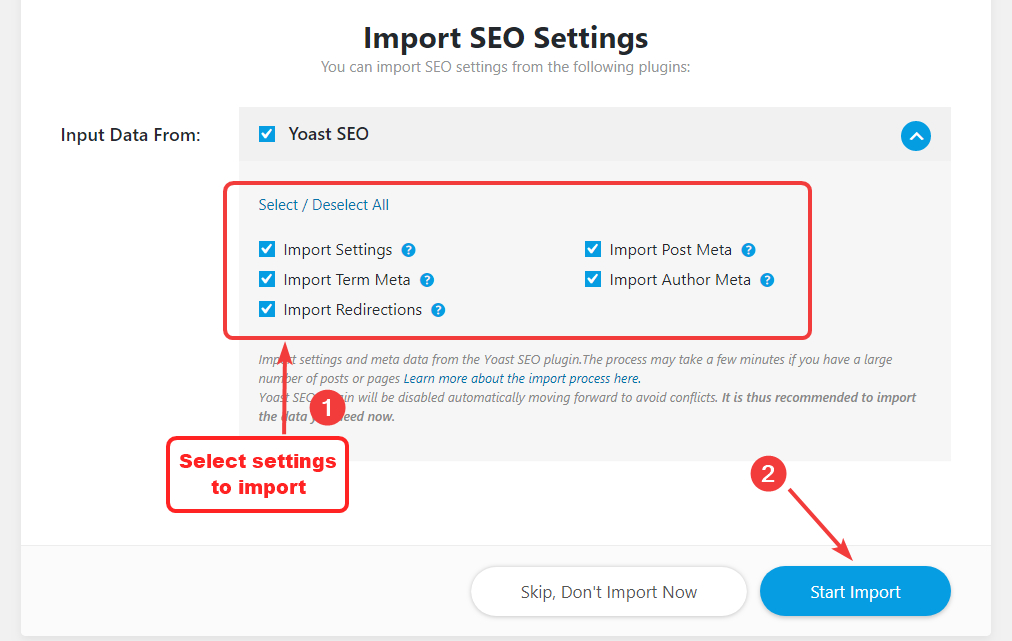 The import process will begin immediately. Rank Math will give you updates about the various settings that are being imported. The time the process takes to finish will depend on how many posts your website has. Once the process is complete, press the continue button.
Rank math can import SEO settings from many SEO plugins. This makes the transition to Rank Math from any SEO plugin seamless, and the change won’t affect your SEO rankings any all.
Rank Math will automatically detect which SEO plugin you’re using and allow you to selectively choose which settings you can import. For example, here is how the Import Data screen appears when your site is set up using Yoast SEO.
You have the ability to customize the import process by importing only selected data from your existing SEO plugin. To check which data will be imported, click the drop-down button on the edge of the Import Data field.
You can select or de-select the data you want to import or not imported. But, a fair bit of warning. **Once the import process begins, the other SEO plugin that you’re using will be disabled (to avoid conflicts), and if you don’t import some of the data, it may be lost forever. That is why we recommend that you select all the data to import. ** It will make the transition smoother.
The import process will begin immediately. Rank Math will give you updates about the various settings that are being imported. The time the process takes to finish will depend on how many posts your website has. Once the process is complete, press the continue button.
Step 2 – Selecting Your Website Type
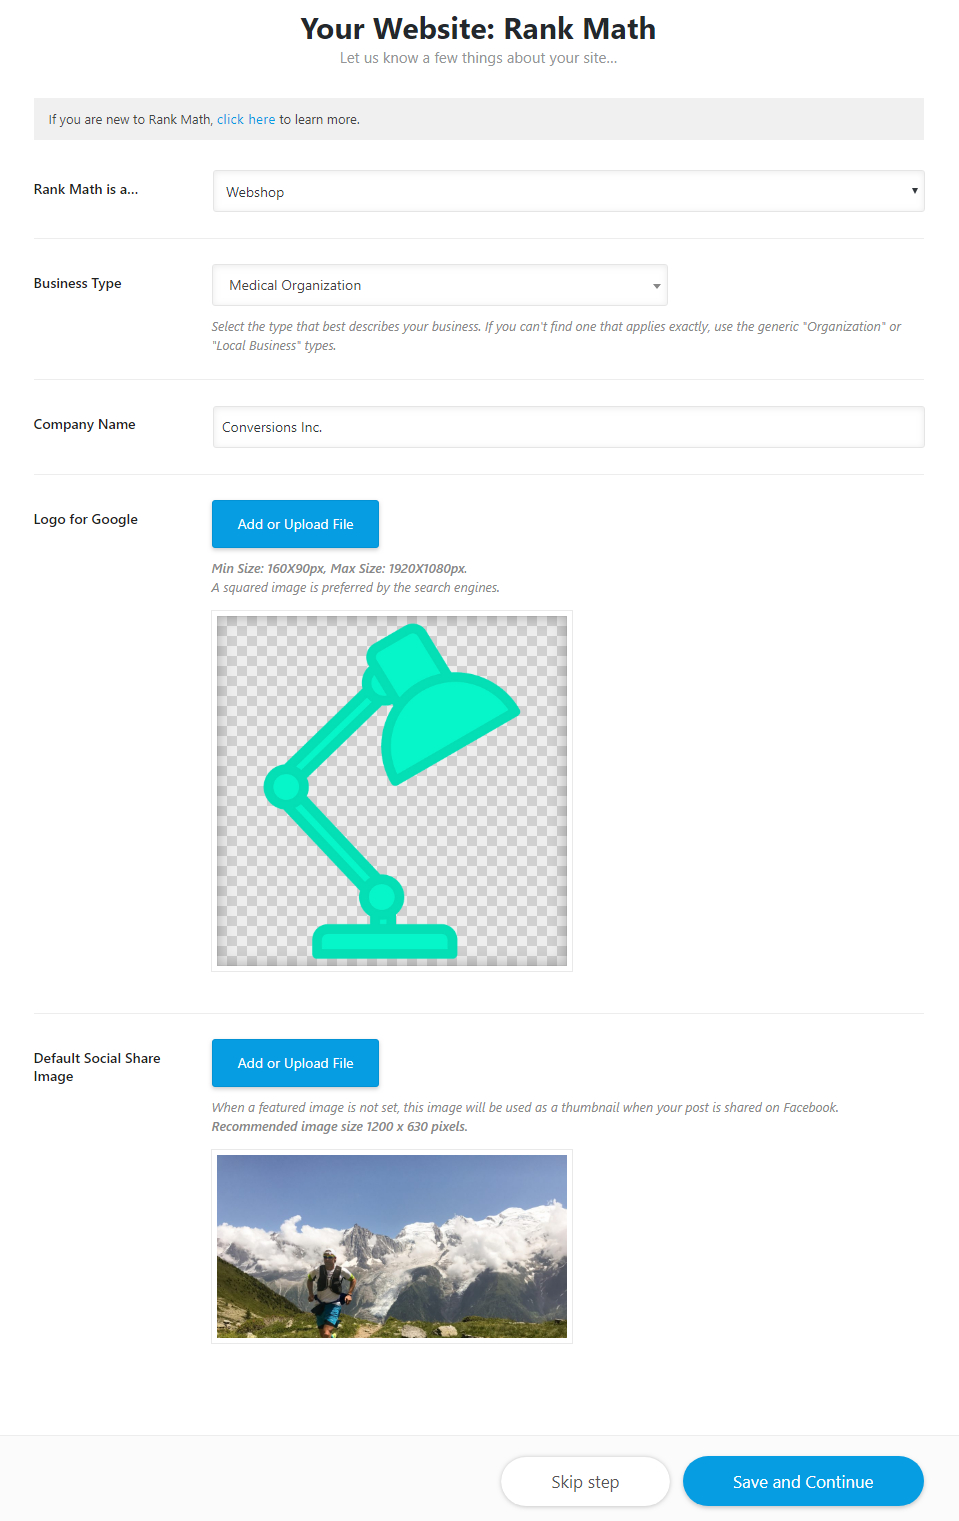
In the next step, you’ll select the type of website that you have and setup Rank Math accordingly. Here is how the screen should appear for this step.
 Of all the options, the first option is the most important to understand and configure as it allows you to configure Rank Math for the type of website you operate. The following options should be available.
 If you explore the settings a bit, then you’ll notice that some of the settings add some additional settings on the page. Here is how it should appear.
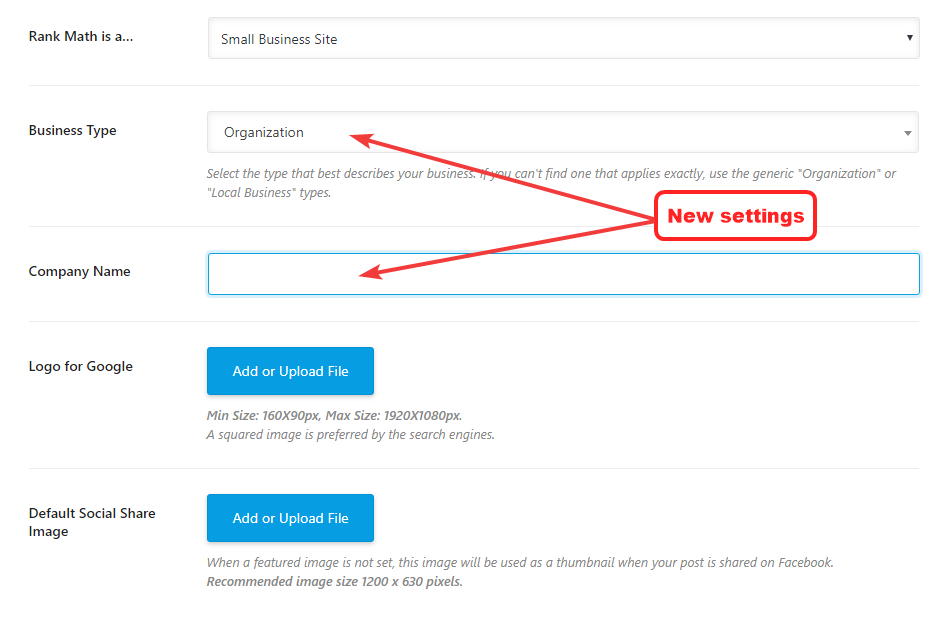 Let us explain why that happens. Although there are many options in the website type field, they can be classified in just 2 categories. Business and personal. Whenever you choose an option that falls in the business category, then these 2 fields will appear.
Before showing you how to configure Rank Math for various types of websites, it would be wise to understand what each of the settings means.
Let us explain why that happens. Although there are many options in the website type field, they can be classified in just 2 categories. Business and personal. Whenever you choose an option that falls in the business category, then these 2 fields will appear.
Before showing you how to configure Rank Math for various types of websites, it would be wise to understand what each of the settings means.
In the next step, you’ll select the type of website that you have and setup Rank Math accordingly. Here is how the screen should appear for this step.
Of all the options, the first option is the most important to understand and configure as it allows you to configure Rank Math for the type of website you operate. The following options should be available.
If you explore the settings a bit, then you’ll notice that some of the settings add some additional settings on the page. Here is how it should appear.
Let us explain why that happens. Although there are many options in the website type field, they can be classified in just 2 categories. Business and personal. Whenever you choose an option that falls in the business category, then these 2 fields will appear.
Before showing you how to configure Rank Math for various types of websites, it would be wise to understand what each of the settings means.
Business Type
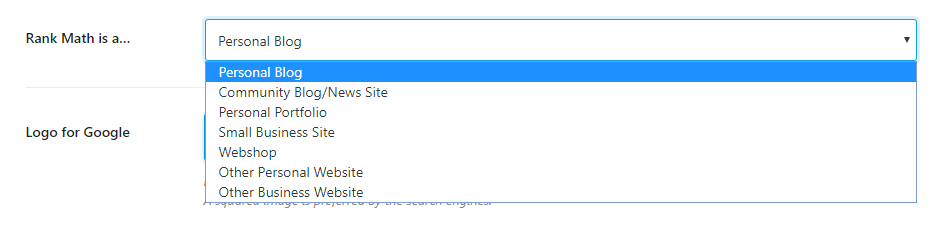
The Business Type field is where you select the kind of business you operate. There are a lot of options available to choose from, so we would suggest taking the time out to pick the one that is closest to your actual business. You can also search your business type by typing it on your keyboard. If your business type is not listed, you can select the “Organization” option as shown in the animation.
Here is a glimpse of all the options.
Company Name
The Company Name is where you enter the legal name of your business. Please note that this can be different from your site name.

The Company Name is where you enter the legal name of your business. Please note that this can be different from your site name.
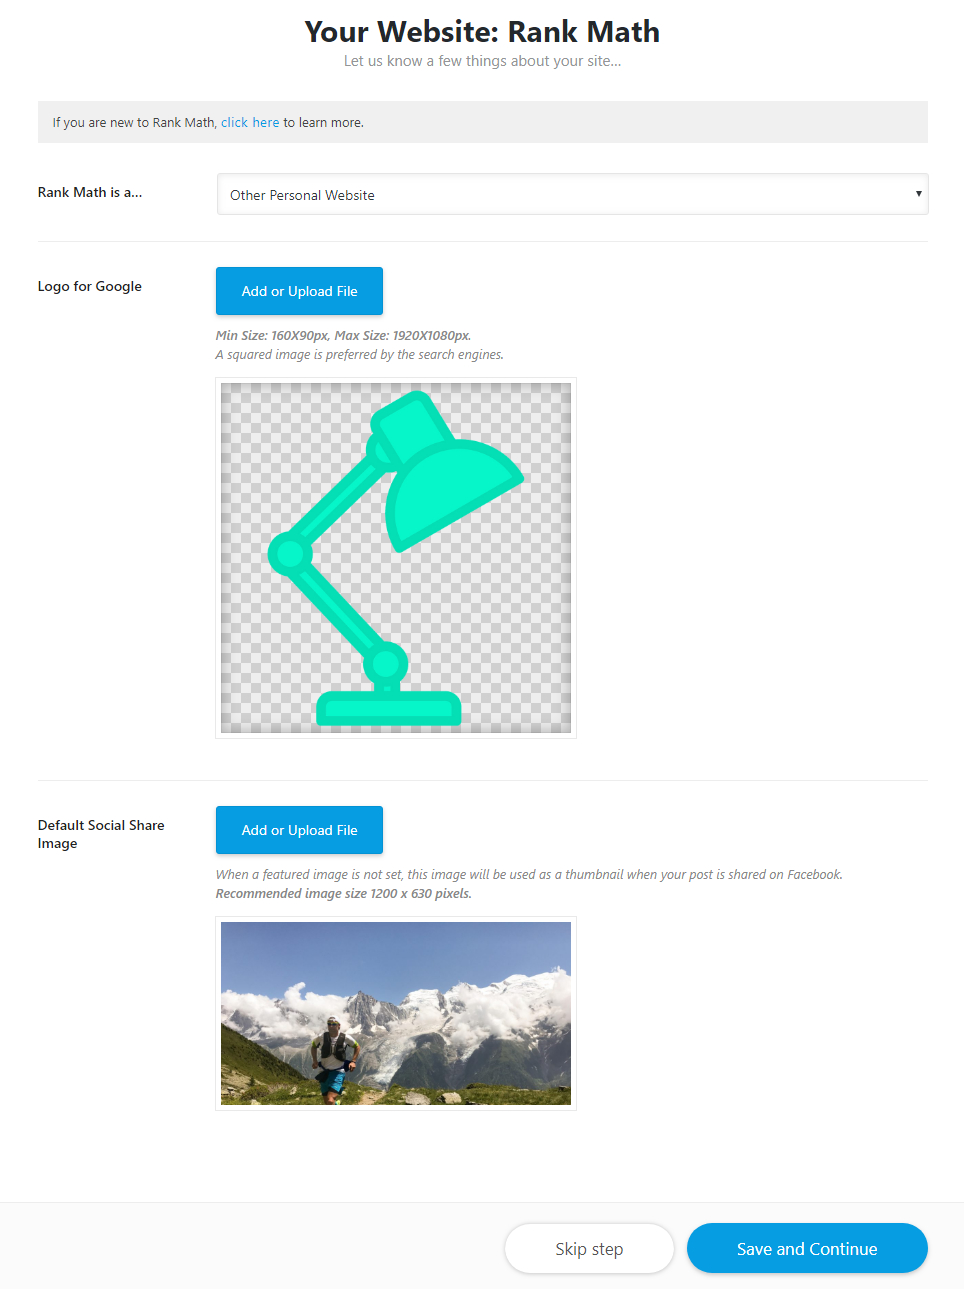
Logo for Google
Here you would upload a logo for your website. The ideal aspect ratio is square, as it is preferred by search engines. The minimum resolution supported is 160×90 pixels, and the maximum resolution that you should upload is 1920x1080px.

Here you would upload a logo for your website. The ideal aspect ratio is square, as it is preferred by search engines. The minimum resolution supported is 160×90 pixels, and the maximum resolution that you should upload is 1920x1080px.
Default Social Share Image
Here you can upload an image which will be made the default for social sharing for your website. Once Rank Math is set up, you’ll have the option to choose a specific image to be used while sharing for each post. If you don’t specify an image, the image you upload here will be used instead.
 Now that you’ve understood what the settings mean let us explain how you should configure Rank Math based on what kind of website you operate.
Here you can upload an image which will be made the default for social sharing for your website. Once Rank Math is set up, you’ll have the option to choose a specific image to be used while sharing for each post. If you don’t specify an image, the image you upload here will be used instead.
Now that you’ve understood what the settings mean let us explain how you should configure Rank Math based on what kind of website you operate.
Setting up Rank Math for Blogs
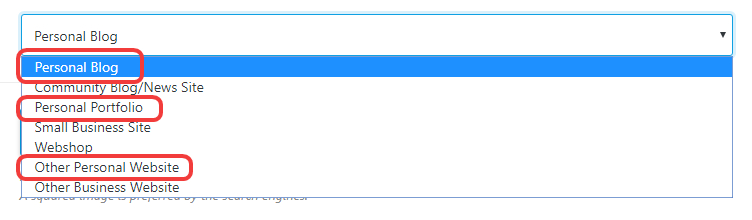
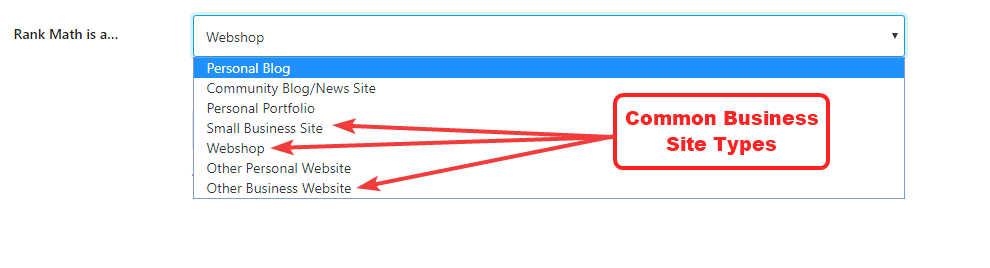
If you’re setting up Rank Math for a blog, you can choose any one of the following options in the website type field.
- Personal Blog
- Personal Portfolio
- Other Personal Website
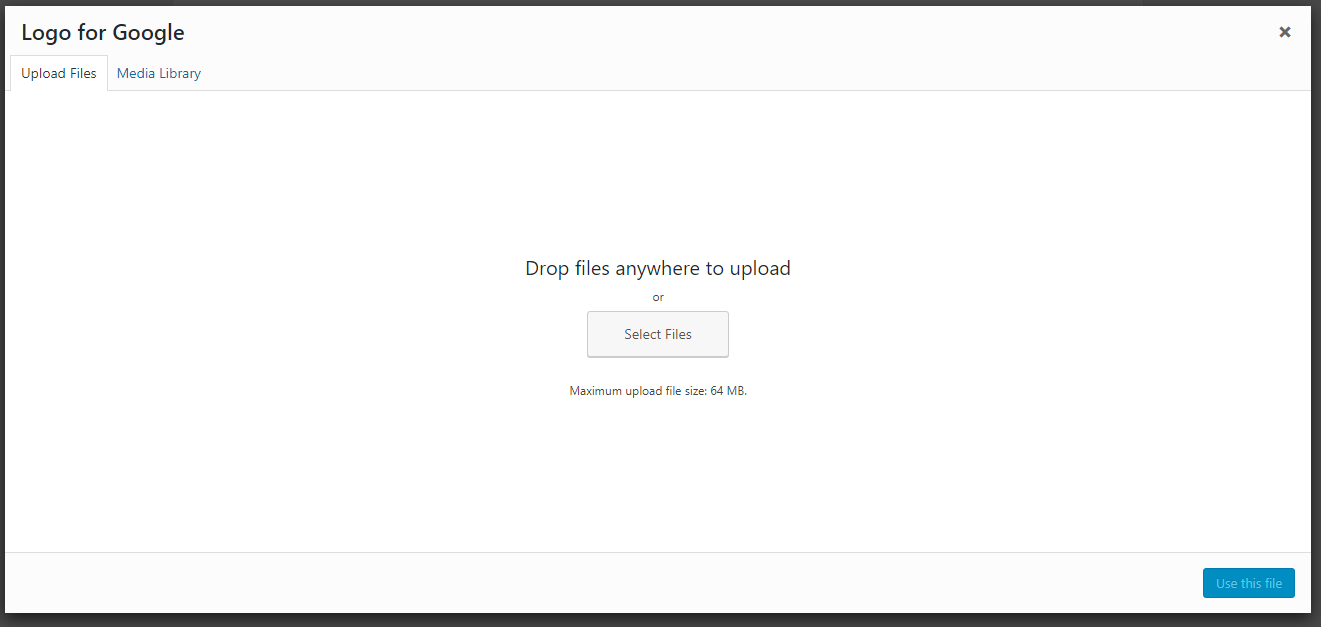
 Next, you’ll upload the Logo for Google by clicking on the “Add or Upload” button next to it.
 WordPress’s media manager will open up. If your website is brand new (like in our example), you won’t have media uploaded on the site. Drag and drop the logo file on to the media manager, or click the “Select Files” button to upload one from your computer.
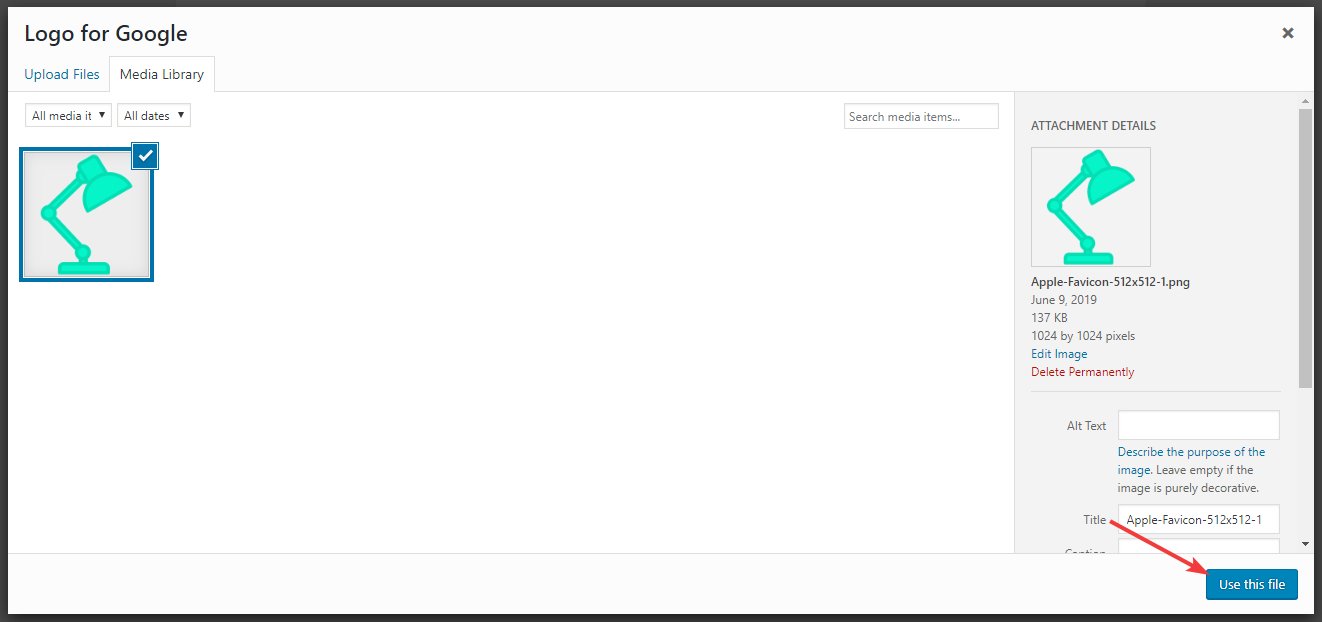
 Once the image is uploaded, click the “Use this file” button on the bottom right to finalize the logo for Google.
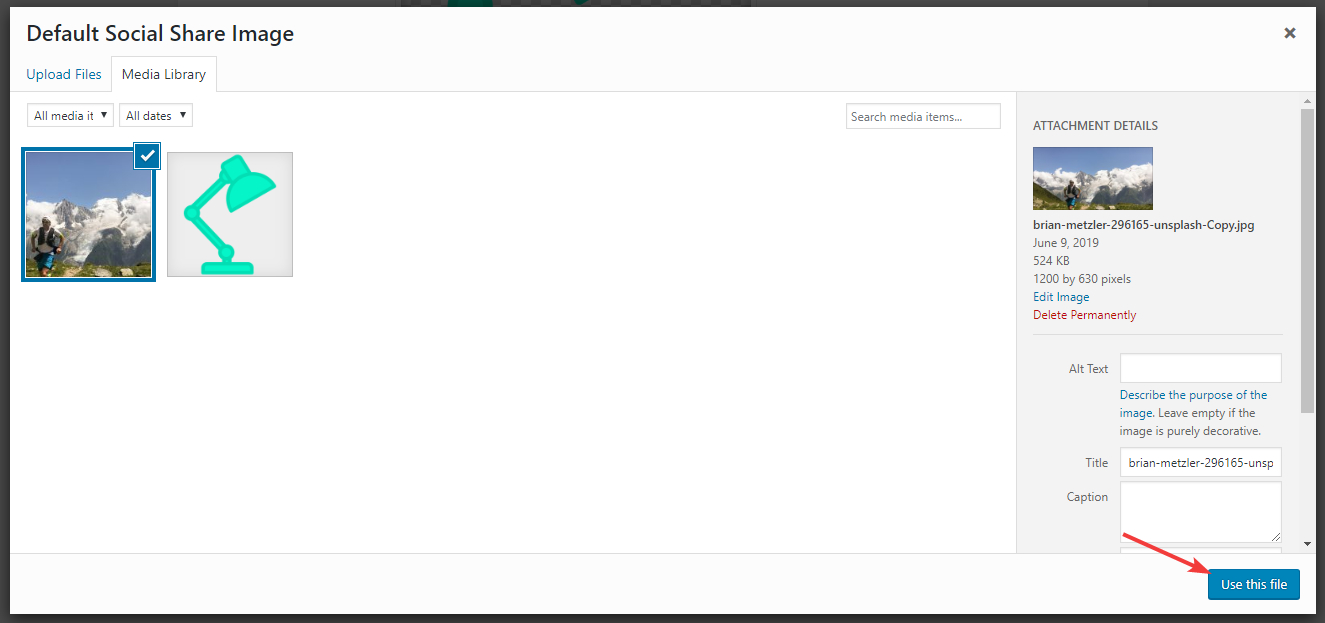
 Next, you’ll select the Default Social Share Image by clicking the “Add or Upload File” button next to it.
 Again, you’ll need to upload a new image by dragging and dropping it on the upload area, or upload one from your computer. Once the image is loaded, click the “Use this image” button to finalize the default social sharing image.
 Once you’ve configured all the settings, the screen should look similar to this.

If you’re setting up Rank Math for a blog, you can choose any one of the following options in the website type field.
- Personal Blog
- Personal Portfolio
- Other Personal Website
Next, you’ll upload the Logo for Google by clicking on the “Add or Upload” button next to it.
WordPress’s media manager will open up. If your website is brand new (like in our example), you won’t have media uploaded on the site. Drag and drop the logo file on to the media manager, or click the “Select Files” button to upload one from your computer.
Once the image is uploaded, click the “Use this file” button on the bottom right to finalize the logo for Google.
Next, you’ll select the Default Social Share Image by clicking the “Add or Upload File” button next to it.
Again, you’ll need to upload a new image by dragging and dropping it on the upload area, or upload one from your computer. Once the image is loaded, click the “Use this image” button to finalize the default social sharing image.
Once you’ve configured all the settings, the screen should look similar to this.
Setting up Rank Math for Businesses
If you’re setting up Rank Math for a business website, then you can select one of the following options.
- Small Business Site
- Other Business Website
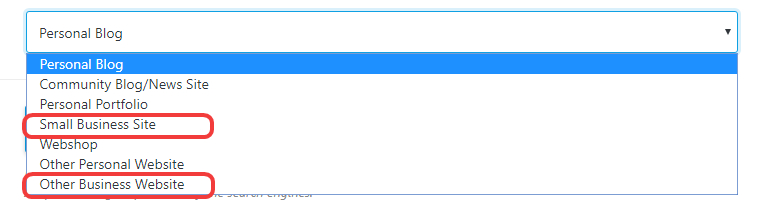 If you can’t find the exact setting that describes your business, do not worry. Choose the setting that describes your website the best.
Next, you’ll choose the business type from the various options. Take some time to go through the options and find the one that suits your business the best. If none of the options describe your business well, then choose the “organization” option, and that will serve as a general option.
If you can’t find the exact setting that describes your business, do not worry. Choose the setting that describes your website the best.
Next, you’ll choose the business type from the various options. Take some time to go through the options and find the one that suits your business the best. If none of the options describe your business well, then choose the “organization” option, and that will serve as a general option.
 Next, you’ll enter your company name in the Company Name field. As we’ve mentioned, the company name is independent of your website’s name. Our recommendation would be to enter your business’s legal name here.
 Next, you’ll upload the Logo for Google by clicking on the “Add or Upload” button next to it.
WordPress’s media manager will open up. If your website is brand new (like in our example), you won’t have media uploaded on the site. Drag and drop the logo file on to the media manager, or click the “Select Files” button to upload one from your computer.
Once the image is uploaded, click the “Use this file” button on the bottom right to finalize the logo for Google.
Next, you’ll select the Default Social Share Image by clicking the “Add or Upload File” button next to it.
Again, you’ll need to upload a new image by dragging and dropping it on the upload area, or upload one from your computer. Once the image is loaded, click the “Use this image” button to finalize the default social sharing image.
Once you’ve configured all the settings, the screen should look similar to this.
Next, you’ll upload the Logo for Google by clicking on the “Add or Upload” button next to it.
WordPress’s media manager will open up. If your website is brand new (like in our example), you won’t have media uploaded on the site. Drag and drop the logo file on to the media manager, or click the “Select Files” button to upload one from your computer.
Once the image is uploaded, click the “Use this file” button on the bottom right to finalize the logo for Google.
Next, you’ll select the Default Social Share Image by clicking the “Add or Upload File” button next to it.
Again, you’ll need to upload a new image by dragging and dropping it on the upload area, or upload one from your computer. Once the image is loaded, click the “Use this image” button to finalize the default social sharing image.
Once you’ve configured all the settings, the screen should look similar to this.

If you’re setting up Rank Math for a business website, then you can select one of the following options.
- Small Business Site
- Other Business Website
If you can’t find the exact setting that describes your business, do not worry. Choose the setting that describes your website the best.
Next, you’ll choose the business type from the various options. Take some time to go through the options and find the one that suits your business the best. If none of the options describe your business well, then choose the “organization” option, and that will serve as a general option.
Next, you’ll enter your company name in the Company Name field. As we’ve mentioned, the company name is independent of your website’s name. Our recommendation would be to enter your business’s legal name here.
Next, you’ll upload the Logo for Google by clicking on the “Add or Upload” button next to it.
WordPress’s media manager will open up. If your website is brand new (like in our example), you won’t have media uploaded on the site. Drag and drop the logo file on to the media manager, or click the “Select Files” button to upload one from your computer.
Once the image is uploaded, click the “Use this file” button on the bottom right to finalize the logo for Google.
Next, you’ll select the Default Social Share Image by clicking the “Add or Upload File” button next to it.
Again, you’ll need to upload a new image by dragging and dropping it on the upload area, or upload one from your computer. Once the image is loaded, click the “Use this image” button to finalize the default social sharing image.
Once you’ve configured all the settings, the screen should look similar to this.
Setting up Rank Math for eCommerce Websites
Rank Math fully supports eCommerce websites and has a lot of features specific to eCommerce websites. To setup Rank Math for your eCommerce website, select the “Webshop” option from the drop-down menu.
 Next, you’ll choose the business type from the various options. Take some time to go through the options and find the one that suits your business the best. If none of the options describe your business well, then choose the “organization” option, and that will serve as a general option.
Next, you’ll enter your company name in the Company Name field. As we’ve mentioned, the company name is independent of your website’s name. Our recommendation would be to enter your business’s legal name here.
Next, you’ll upload the Logo for Google by clicking on the “Add or Upload” button next to it.
WordPress’s media manager will open up. If your website is brand new (like in our example), you won’t have media uploaded on the site. Drag and drop the logo file on to the media manager, or click the “Select Files” button to upload one from your computer.
Once the image is uploaded, click the “Use this file” button on the bottom right to finalize the logo for Google.
Next, you’ll select the Default Social Share Image by clicking the “Add or Upload File” button next to it.
Again, you’ll need to upload a new image by dragging and dropping it on the upload area, or upload one from your computer. Once the image is loaded, click the “Use this image” button to finalize the default social sharing image.
Once you’ve configured all the settings, the screen should look similar to this.
Next, you’ll choose the business type from the various options. Take some time to go through the options and find the one that suits your business the best. If none of the options describe your business well, then choose the “organization” option, and that will serve as a general option.
Next, you’ll enter your company name in the Company Name field. As we’ve mentioned, the company name is independent of your website’s name. Our recommendation would be to enter your business’s legal name here.
Next, you’ll upload the Logo for Google by clicking on the “Add or Upload” button next to it.
WordPress’s media manager will open up. If your website is brand new (like in our example), you won’t have media uploaded on the site. Drag and drop the logo file on to the media manager, or click the “Select Files” button to upload one from your computer.
Once the image is uploaded, click the “Use this file” button on the bottom right to finalize the logo for Google.
Next, you’ll select the Default Social Share Image by clicking the “Add or Upload File” button next to it.
Again, you’ll need to upload a new image by dragging and dropping it on the upload area, or upload one from your computer. Once the image is loaded, click the “Use this image” button to finalize the default social sharing image.
Once you’ve configured all the settings, the screen should look similar to this.
Rank Math fully supports eCommerce websites and has a lot of features specific to eCommerce websites. To setup Rank Math for your eCommerce website, select the “Webshop” option from the drop-down menu.
Next, you’ll choose the business type from the various options. Take some time to go through the options and find the one that suits your business the best. If none of the options describe your business well, then choose the “organization” option, and that will serve as a general option.
Next, you’ll enter your company name in the Company Name field. As we’ve mentioned, the company name is independent of your website’s name. Our recommendation would be to enter your business’s legal name here.
Next, you’ll upload the Logo for Google by clicking on the “Add or Upload” button next to it.
WordPress’s media manager will open up. If your website is brand new (like in our example), you won’t have media uploaded on the site. Drag and drop the logo file on to the media manager, or click the “Select Files” button to upload one from your computer.
Once the image is uploaded, click the “Use this file” button on the bottom right to finalize the logo for Google.
Next, you’ll select the Default Social Share Image by clicking the “Add or Upload File” button next to it.
Again, you’ll need to upload a new image by dragging and dropping it on the upload area, or upload one from your computer. Once the image is loaded, click the “Use this image” button to finalize the default social sharing image.
Once you’ve configured all the settings, the screen should look similar to this.
Setting up Rank Math for Local Businesses
Rank Math fully supports Local Business websites and has many features that help local websites to achieve higher rankings. For example, setting up your website as a Local Business automatically enables the Local SEO setting inside Rank Math.
To set up your website as a Local Business, select the appropriate business type in the Site-Type setting.
 Since you’re setting up a website for your local business, you’ll choose the Local Business setting in the Business Type option.
 Next, you’ll enter your company name in the Company Name field. As we’ve mentioned, the company name is independent of your website’s name. Our recommendation would be to enter your business’s legal name here.
Next, you’ll upload the Logo for Google by clicking on the “Add or Upload” button next to it.
WordPress’s media manager will open up. If your website is brand new (like in our example), you won’t have media uploaded on the site. Drag and drop the logo file on to the media manager, or click the “Select Files” button to upload one from your computer.
Once the image is uploaded, click the “Use this file” button on the bottom right to finalize the logo for Google.
Next, you’ll select the Default Social Share Image by clicking the “Add or Upload File” button next to it.
Again, you’ll need to upload a new image by dragging and dropping it on the upload area, or upload one from your computer. Once the image is loaded, click the “Use this image” button to finalize the default social sharing image.
Once you’ve configured all the settings, the screen should look similar to this.
Next, you’ll enter your company name in the Company Name field. As we’ve mentioned, the company name is independent of your website’s name. Our recommendation would be to enter your business’s legal name here.
Next, you’ll upload the Logo for Google by clicking on the “Add or Upload” button next to it.
WordPress’s media manager will open up. If your website is brand new (like in our example), you won’t have media uploaded on the site. Drag and drop the logo file on to the media manager, or click the “Select Files” button to upload one from your computer.
Once the image is uploaded, click the “Use this file” button on the bottom right to finalize the logo for Google.
Next, you’ll select the Default Social Share Image by clicking the “Add or Upload File” button next to it.
Again, you’ll need to upload a new image by dragging and dropping it on the upload area, or upload one from your computer. Once the image is loaded, click the “Use this image” button to finalize the default social sharing image.
Once you’ve configured all the settings, the screen should look similar to this.

Rank Math fully supports Local Business websites and has many features that help local websites to achieve higher rankings. For example, setting up your website as a Local Business automatically enables the Local SEO setting inside Rank Math.
To set up your website as a Local Business, select the appropriate business type in the Site-Type setting.
Since you’re setting up a website for your local business, you’ll choose the Local Business setting in the Business Type option.
Next, you’ll enter your company name in the Company Name field. As we’ve mentioned, the company name is independent of your website’s name. Our recommendation would be to enter your business’s legal name here.
Next, you’ll upload the Logo for Google by clicking on the “Add or Upload” button next to it.
WordPress’s media manager will open up. If your website is brand new (like in our example), you won’t have media uploaded on the site. Drag and drop the logo file on to the media manager, or click the “Select Files” button to upload one from your computer.
Once the image is uploaded, click the “Use this file” button on the bottom right to finalize the logo for Google.
Next, you’ll select the Default Social Share Image by clicking the “Add or Upload File” button next to it.
Again, you’ll need to upload a new image by dragging and dropping it on the upload area, or upload one from your computer. Once the image is loaded, click the “Use this image” button to finalize the default social sharing image.
Once you’ve configured all the settings, the screen should look similar to this.
Setting up Rank Math for Everyone else
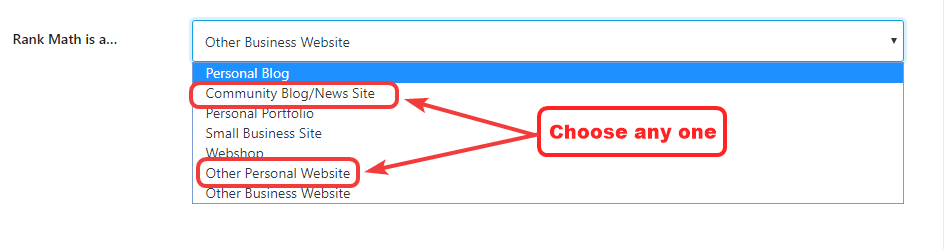
We’ve already discussed how to setup Rank Math for blogs, businesses, eCommerce websites, and Local websites. If your website does not fit into any of these roles, then you can choose from the remaining options.
- Community Blog/News Site
- Other Personal Website
 Next, you’ll upload the Logo for Google by clicking on the “Add or Upload” button next to it.
WordPress’s media manager will open up. If your website is brand new (like in our example), you won’t have media uploaded on the site. Drag and drop the logo file on to the media manager, or click the “Select Files” button to upload one from your computer.
Once the image is uploaded, click the “Use this file” button on the bottom right to finalize the logo for Google.
Next, you’ll select the Default Social Share Image by clicking the “Add or Upload File” button next to it.
Again, you’ll need to upload a new image by dragging and dropping it on the upload area, or upload one from your computer. Once the image is loaded, click the “Use this image” button to finalize the default social sharing image.
Once you’ve configured all the settings, the screen should look similar to this.
Next, you’ll upload the Logo for Google by clicking on the “Add or Upload” button next to it.
WordPress’s media manager will open up. If your website is brand new (like in our example), you won’t have media uploaded on the site. Drag and drop the logo file on to the media manager, or click the “Select Files” button to upload one from your computer.
Once the image is uploaded, click the “Use this file” button on the bottom right to finalize the logo for Google.
Next, you’ll select the Default Social Share Image by clicking the “Add or Upload File” button next to it.
Again, you’ll need to upload a new image by dragging and dropping it on the upload area, or upload one from your computer. Once the image is loaded, click the “Use this image” button to finalize the default social sharing image.
Once you’ve configured all the settings, the screen should look similar to this.
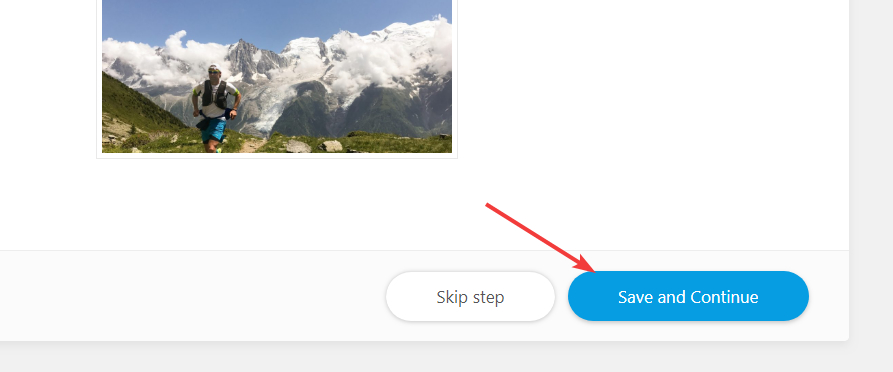
 Once you’ve configured all the settings to your liking, you are ready to move on to the next step. Click the “Save and Continue” button to head over to the next step.
We’ve already discussed how to setup Rank Math for blogs, businesses, eCommerce websites, and Local websites. If your website does not fit into any of these roles, then you can choose from the remaining options.
- Community Blog/News Site
- Other Personal Website
Next, you’ll upload the Logo for Google by clicking on the “Add or Upload” button next to it.
WordPress’s media manager will open up. If your website is brand new (like in our example), you won’t have media uploaded on the site. Drag and drop the logo file on to the media manager, or click the “Select Files” button to upload one from your computer.
Once the image is uploaded, click the “Use this file” button on the bottom right to finalize the logo for Google.
Next, you’ll select the Default Social Share Image by clicking the “Add or Upload File” button next to it.
Again, you’ll need to upload a new image by dragging and dropping it on the upload area, or upload one from your computer. Once the image is loaded, click the “Use this image” button to finalize the default social sharing image.
Once you’ve configured all the settings, the screen should look similar to this.
Once you’ve configured all the settings to your liking, you are ready to move on to the next step. Click the “Save and Continue” button to head over to the next step.
Step 3 – Setting Up Google Search Console
In this step, you’ll setup Rank Math to work with Google Search Console. If you don’t know what Google Search Console is, here is a brief introduction.
Google Search Console is a set of tools created for webmasters or website owners. Once a website is connected with Google Search Console, website owners can access information about how Google is viewing, fetching, and indexing their website. It helps them set up their websites in a way that Google can understand all the content on the website, including structured data. Inside the Search Console, website owners can see their current index status, crawl status, and any issues that Google might be facing with their website. The Search Console also holds information about all the keywords that your website is ranking for, and it is the most accurate data as it comes directly from Google.
When you connect your Search Console account with Rank Math, Rank Math uses Google Search Console’s official API to fetch important statistics about your website and display them right inside your website’s admin area. This saves you hours of manual time, and you also get access to actionable, real-time data when you’re working on your website.
Here is how the configuration page for Google Search Console looks like.
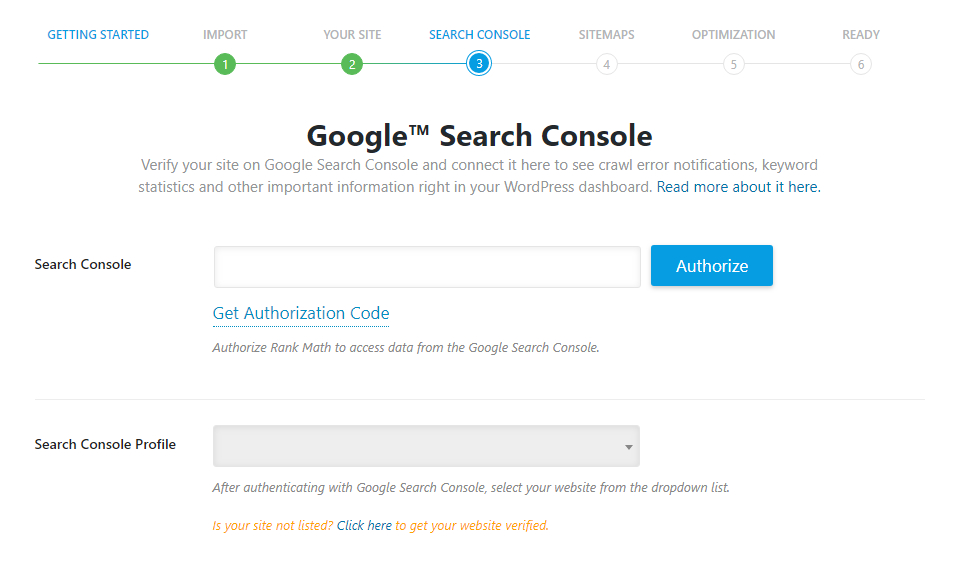 Setting up Google Search Console with Rank Math is a 3 step process.
- Ensure that your website is added to the Search Console
- Authenticate Rank Math to connect with Search Console
- Choosing the right property for Rank Math to fetch data for
Let us understand each of these steps in detail.
In this step, you’ll setup Rank Math to work with Google Search Console. If you don’t know what Google Search Console is, here is a brief introduction.
Google Search Console is a set of tools created for webmasters or website owners. Once a website is connected with Google Search Console, website owners can access information about how Google is viewing, fetching, and indexing their website. It helps them set up their websites in a way that Google can understand all the content on the website, including structured data. Inside the Search Console, website owners can see their current index status, crawl status, and any issues that Google might be facing with their website. The Search Console also holds information about all the keywords that your website is ranking for, and it is the most accurate data as it comes directly from Google.
When you connect your Search Console account with Rank Math, Rank Math uses Google Search Console’s official API to fetch important statistics about your website and display them right inside your website’s admin area. This saves you hours of manual time, and you also get access to actionable, real-time data when you’re working on your website.
Here is how the configuration page for Google Search Console looks like.
Setting up Google Search Console with Rank Math is a 3 step process.
- Ensure that your website is added to the Search Console
- Authenticate Rank Math to connect with Search Console
- Choosing the right property for Rank Math to fetch data for
Let us understand each of these steps in detail.
Ensure that your website is added to Search Console
If you’re installing Rank Math on a brand new website, then it is likely that you haven’t yet connected your website with Google Search Console. Obviously, if your website is not connected to the Search Console, then Rank Math cannot fetch any information about it. That is why this step is the first step in the process.
If your website is already connected to Search Console, then you can skip this step and head over to the next one.
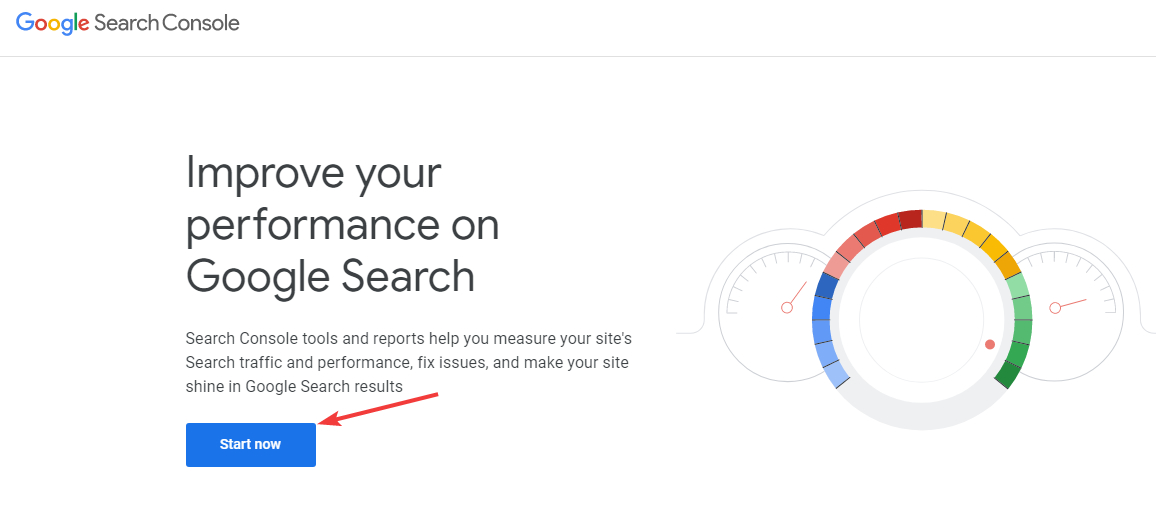
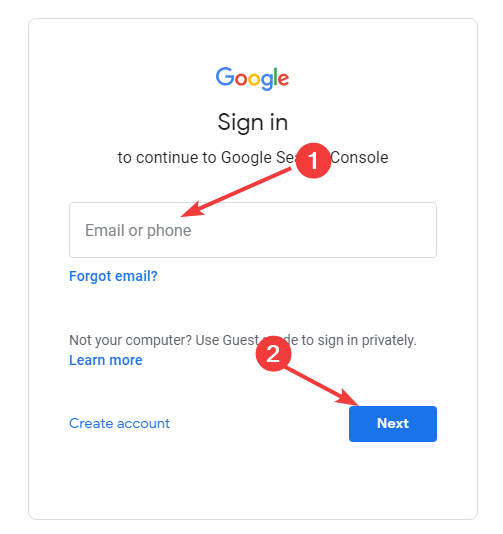
To connect your website with Google Search Console, you start by heading over to Search Console’s website. Click the “Start Now” button to log in.
 A login screen will show up, and you’ll need to use a Google account to sign in. Enter your credentials and hit next. If you already have one or more Google accounts signed into your computer, then you might see an option to choose one of those accounts to log in directly.
 Once you’re logged in, you’ll see the Search Console in all its glory. Here is an example of how it should look like.
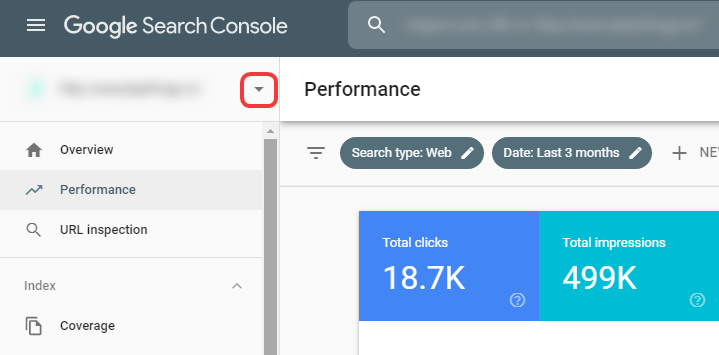
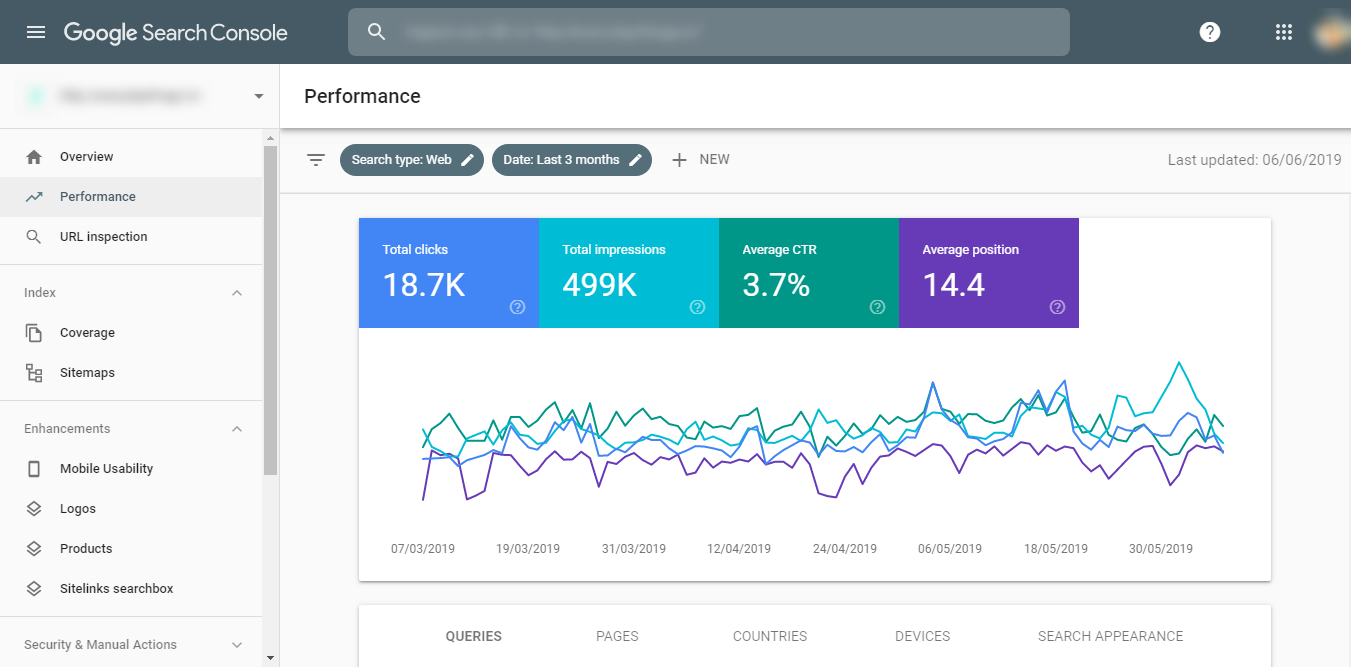 Since you don’t have any website connected inside Search Console, your Search Console would look somewhat different. Click the drop-down button in the property selector to see all the options.
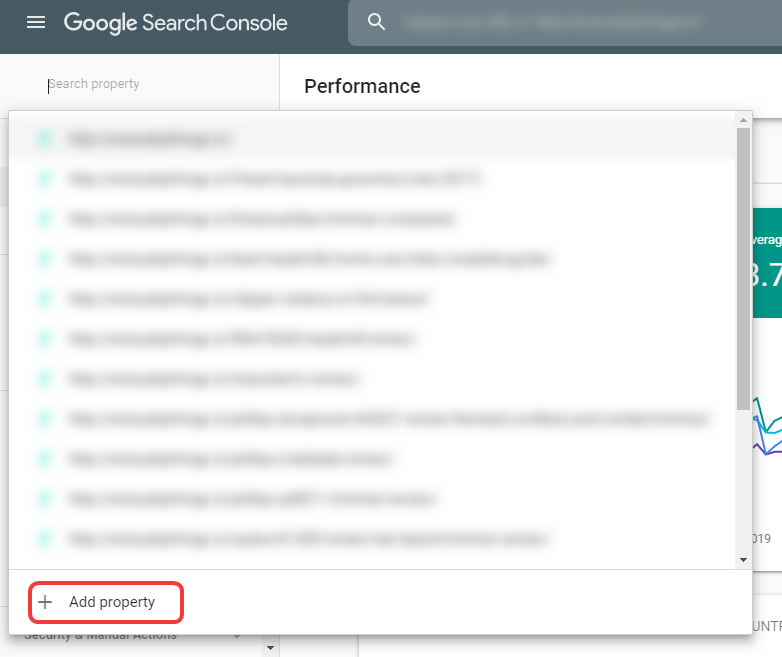
 Depending on how your search console is set up, you will see some options in the drop-down menu. Most importantly, you will see a “Add New Property” option. Click it to add a new property.
 You should see 2 options on the screen, a domain-based property, and a URL based property.
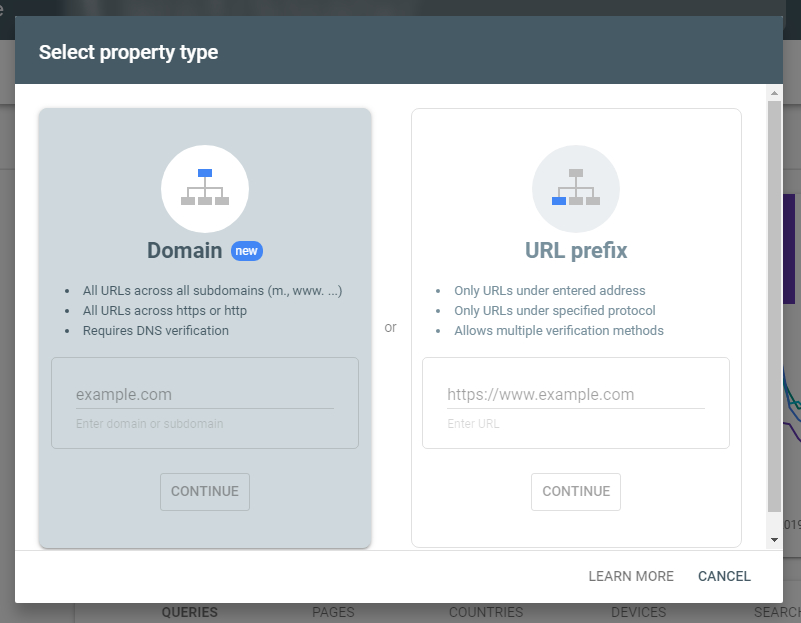 A domain-based property offers a more comprehensive coverage, but it is only required for websites with multiple sub-domains and the like. It is also harder to verify a domain based property. We will use a URL based property to verify our website instead. If you’re interested in knowing the difference, here is what Google has to say about the topic.
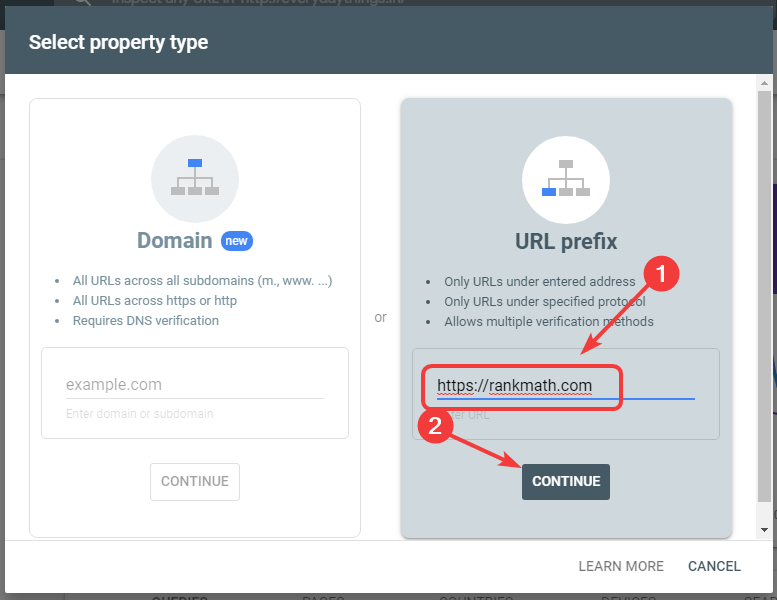
Enter your website’s URL in the field under URL prefix, and click the continue button.
A domain-based property offers a more comprehensive coverage, but it is only required for websites with multiple sub-domains and the like. It is also harder to verify a domain based property. We will use a URL based property to verify our website instead. If you’re interested in knowing the difference, here is what Google has to say about the topic.
Enter your website’s URL in the field under URL prefix, and click the continue button.
 Google will attempt to verify the ownership of your property. If it is not already verified, you will be presented with some verification options.
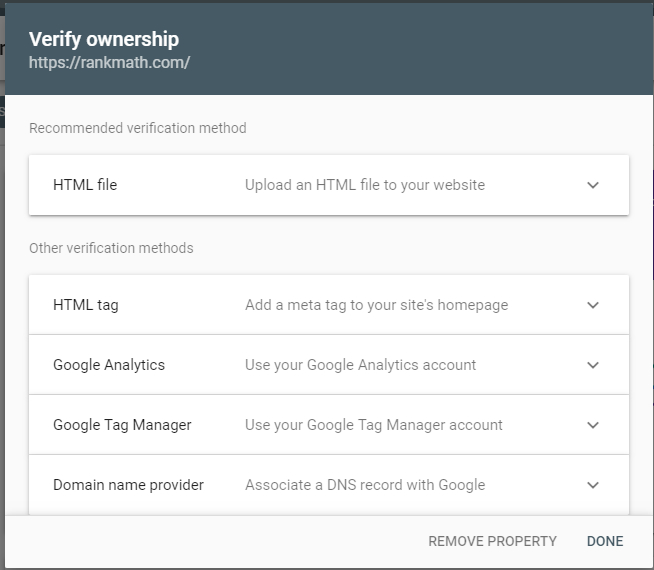 Of all the methods available, we will use the HTML tag method to verify our ownership, as it will be made easy by Rank Math. Click the HTML tag entry to open up some details, and copy the meta tag that Google displays.
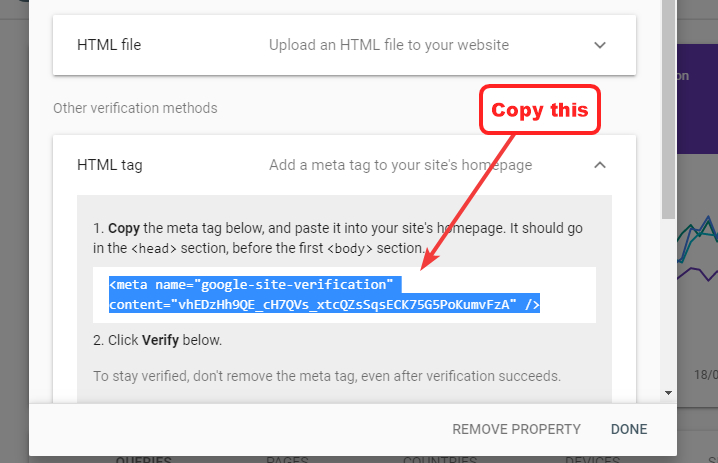 Note: This is not the authorization code that Rank Math requests to connect with Search Console. This is a different code that the Search Console uses to verify that you actually own the website you claim to.
The verification code has to be entered inside Rank Math’s settings. Once it’s there, Rank Math will generate the appropriate markup and insert it into your pages, and when Google sees that markup, the ownership of your website will be confirmed.
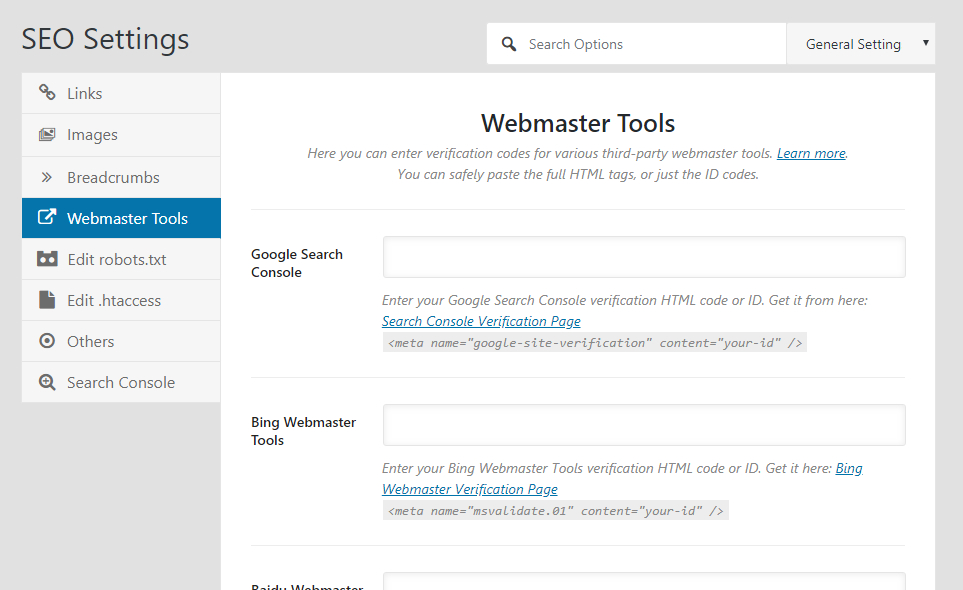
To paste the code, open a new tab on your browser and log into your WordPress admin again. Once you’re in, head over to Rank Math > General Settings > Webmaster Tools.
Alternatively, you can click highlighted on the setup wizard’s page as well. The link opens a new tab, so your progress isn’t lost.
Note: This is not the authorization code that Rank Math requests to connect with Search Console. This is a different code that the Search Console uses to verify that you actually own the website you claim to.
The verification code has to be entered inside Rank Math’s settings. Once it’s there, Rank Math will generate the appropriate markup and insert it into your pages, and when Google sees that markup, the ownership of your website will be confirmed.
To paste the code, open a new tab on your browser and log into your WordPress admin again. Once you’re in, head over to Rank Math > General Settings > Webmaster Tools.
Alternatively, you can click highlighted on the setup wizard’s page as well. The link opens a new tab, so your progress isn’t lost.
 The link will take you to the same settings page, which should look similar to this.
 Paste your verification code in the Google Search Console field, and then save your settings.
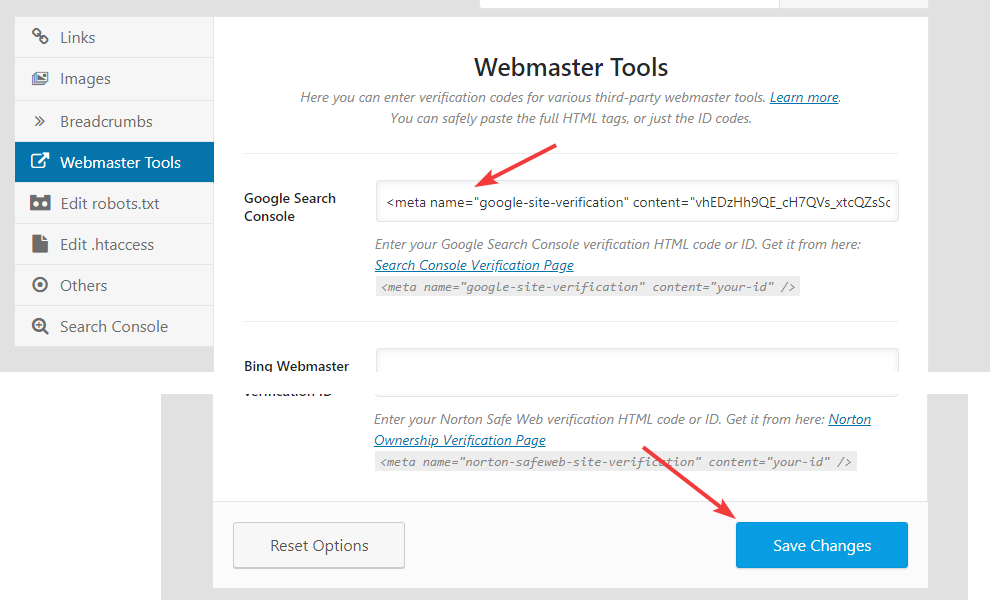 You should see a banner on the top of the page indicating that your settings were saved.
 That’s the end of step 1. Now, on to step number 2.
If you’re installing Rank Math on a brand new website, then it is likely that you haven’t yet connected your website with Google Search Console. Obviously, if your website is not connected to the Search Console, then Rank Math cannot fetch any information about it. That is why this step is the first step in the process.
If your website is already connected to Search Console, then you can skip this step and head over to the next one.
To connect your website with Google Search Console, you start by heading over to Search Console’s website. Click the “Start Now” button to log in.
A login screen will show up, and you’ll need to use a Google account to sign in. Enter your credentials and hit next. If you already have one or more Google accounts signed into your computer, then you might see an option to choose one of those accounts to log in directly.
Once you’re logged in, you’ll see the Search Console in all its glory. Here is an example of how it should look like.
Since you don’t have any website connected inside Search Console, your Search Console would look somewhat different. Click the drop-down button in the property selector to see all the options.
Depending on how your search console is set up, you will see some options in the drop-down menu. Most importantly, you will see a “Add New Property” option. Click it to add a new property.
You should see 2 options on the screen, a domain-based property, and a URL based property.
A domain-based property offers a more comprehensive coverage, but it is only required for websites with multiple sub-domains and the like. It is also harder to verify a domain based property. We will use a URL based property to verify our website instead. If you’re interested in knowing the difference, here is what Google has to say about the topic.
Enter your website’s URL in the field under URL prefix, and click the continue button.
Google will attempt to verify the ownership of your property. If it is not already verified, you will be presented with some verification options.
Of all the methods available, we will use the HTML tag method to verify our ownership, as it will be made easy by Rank Math. Click the HTML tag entry to open up some details, and copy the meta tag that Google displays.
Note: This is not the authorization code that Rank Math requests to connect with Search Console. This is a different code that the Search Console uses to verify that you actually own the website you claim to.
The verification code has to be entered inside Rank Math’s settings. Once it’s there, Rank Math will generate the appropriate markup and insert it into your pages, and when Google sees that markup, the ownership of your website will be confirmed.
To paste the code, open a new tab on your browser and log into your WordPress admin again. Once you’re in, head over to Rank Math > General Settings > Webmaster Tools.
Alternatively, you can click highlighted on the setup wizard’s page as well. The link opens a new tab, so your progress isn’t lost.
The link will take you to the same settings page, which should look similar to this.
Paste your verification code in the Google Search Console field, and then save your settings.
You should see a banner on the top of the page indicating that your settings were saved.
That’s the end of step 1. Now, on to step number 2.
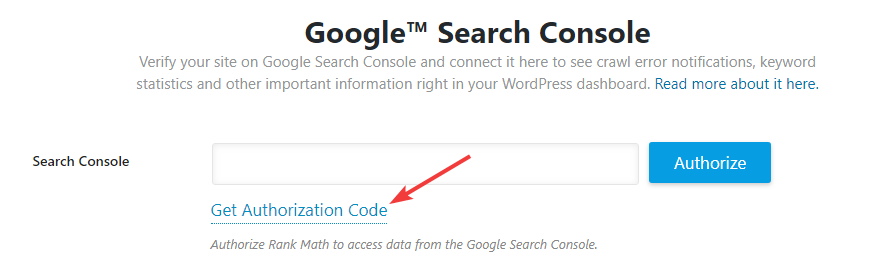
Authenticate Rank Math to connect with Search Console
If you’re on this step, then you have a website (or a property) verified in Search Console, which means Google is now collecting data about that property.
In this step, you’re going to authorize Rank Math to fetch that data from Search Console in order for it to be displayed right inside your admin area.
Click the “Get Authorization Code” link present on the Search Console page.a
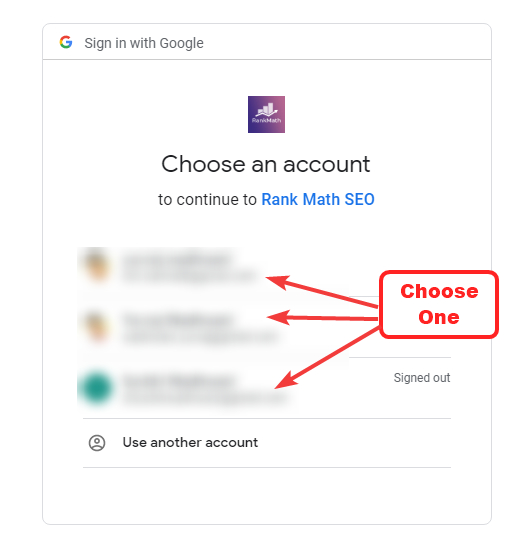
 A popup window will open up, which would list all your currently signed in Google accounts. Choose the account you used to verify your website.
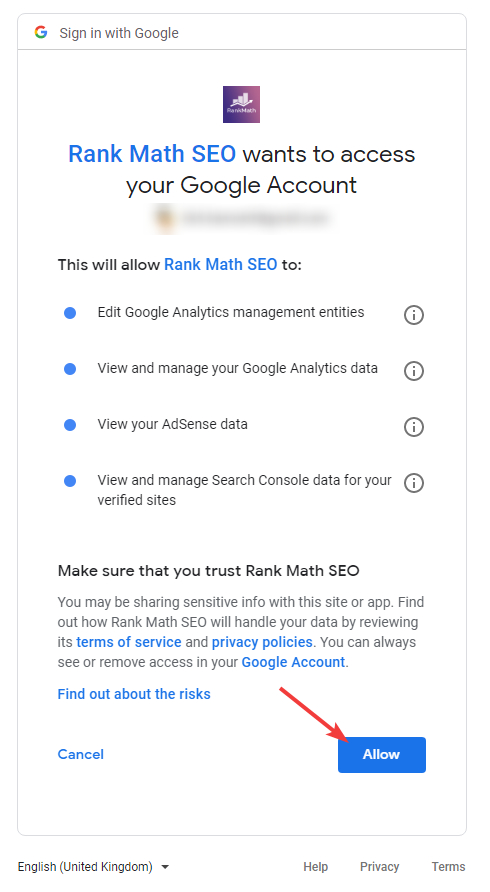
 The next screen will show what permissions Rank Math will get after the authorization. Click the “Allow” Button to continue.
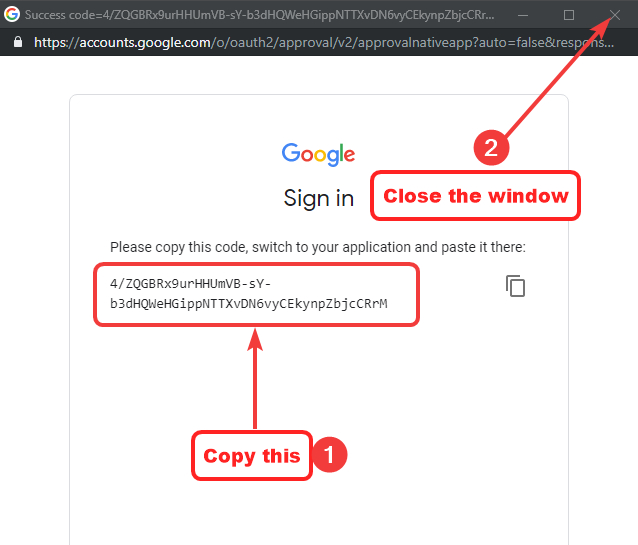
 Once you do, you’ll see an authorization code generated by Google. Copy the code, and then close the window. We’ve blurred the security code a bit for privacy reasons.
 Paste the authorization code in the Search Console field. As soon as you do, Rank Math will automatically try to verify the code. In a few seconds, the code should disappear, and you should see something like this.
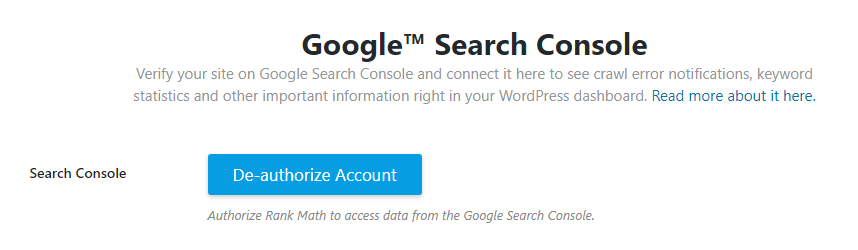 If you see this screen, that means you’ve authorized your Search Console account with Rank Math. You’ll start getting some notifications from Google on your phone reminding you of the change, which you can dismiss, of course.
If you have multiple Google accounts and accidentally linked the wrong Google account with Rank Math, you can de-authorize your account using the “De-authorize” button, and repeat the authorization process.
If you see this screen, that means you’ve authorized your Search Console account with Rank Math. You’ll start getting some notifications from Google on your phone reminding you of the change, which you can dismiss, of course.
If you have multiple Google accounts and accidentally linked the wrong Google account with Rank Math, you can de-authorize your account using the “De-authorize” button, and repeat the authorization process.
If you’re on this step, then you have a website (or a property) verified in Search Console, which means Google is now collecting data about that property.
In this step, you’re going to authorize Rank Math to fetch that data from Search Console in order for it to be displayed right inside your admin area.
Click the “Get Authorization Code” link present on the Search Console page.a
A popup window will open up, which would list all your currently signed in Google accounts. Choose the account you used to verify your website.
The next screen will show what permissions Rank Math will get after the authorization. Click the “Allow” Button to continue.
Once you do, you’ll see an authorization code generated by Google. Copy the code, and then close the window. We’ve blurred the security code a bit for privacy reasons.
Paste the authorization code in the Search Console field. As soon as you do, Rank Math will automatically try to verify the code. In a few seconds, the code should disappear, and you should see something like this.
If you see this screen, that means you’ve authorized your Search Console account with Rank Math. You’ll start getting some notifications from Google on your phone reminding you of the change, which you can dismiss, of course.
If you have multiple Google accounts and accidentally linked the wrong Google account with Rank Math, you can de-authorize your account using the “De-authorize” button, and repeat the authorization process.
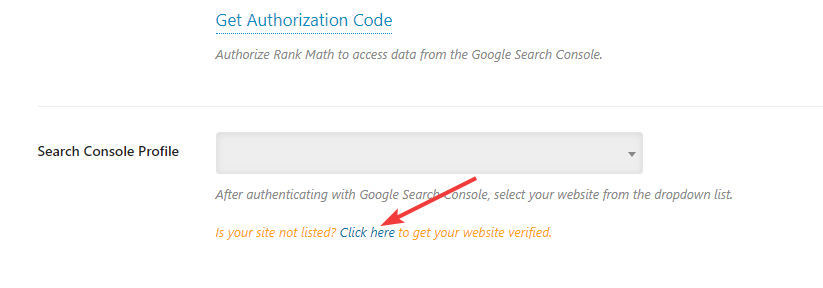
Choosing the right property for Rank Math to fetch data for
The next step is to select the appropriate Search Console Property in the Search Console Profile setting. Before proceeding, there are a few things you should understand.
First, Google Search Console will only display information about your website after you’ve verified that you own the website. If your website is not verified, then it will not be shown here. We will also discuss how to get your website verified in the next few steps.
Second, Google Search Console gathers data on individual properties. A property might be a website or even an individual page on your website.
When you click the Search Console Profile drop-down, you will see all your properties in the list. Select your website from the drop-down. If you have multiple properties, you can type in a few keywords, and the list will be filtered based.
 If you can’t see your property, verify that you’ve connected the right Google Account with Search Console. If you have, then it would be a good idea to hit the “Refresh Sites” button and try once again.
That’s the end of the third step. Once you’ve completed it, your page should look something like this.
If you can’t see your property, verify that you’ve connected the right Google Account with Search Console. If you have, then it would be a good idea to hit the “Refresh Sites” button and try once again.
That’s the end of the third step. Once you’ve completed it, your page should look something like this.
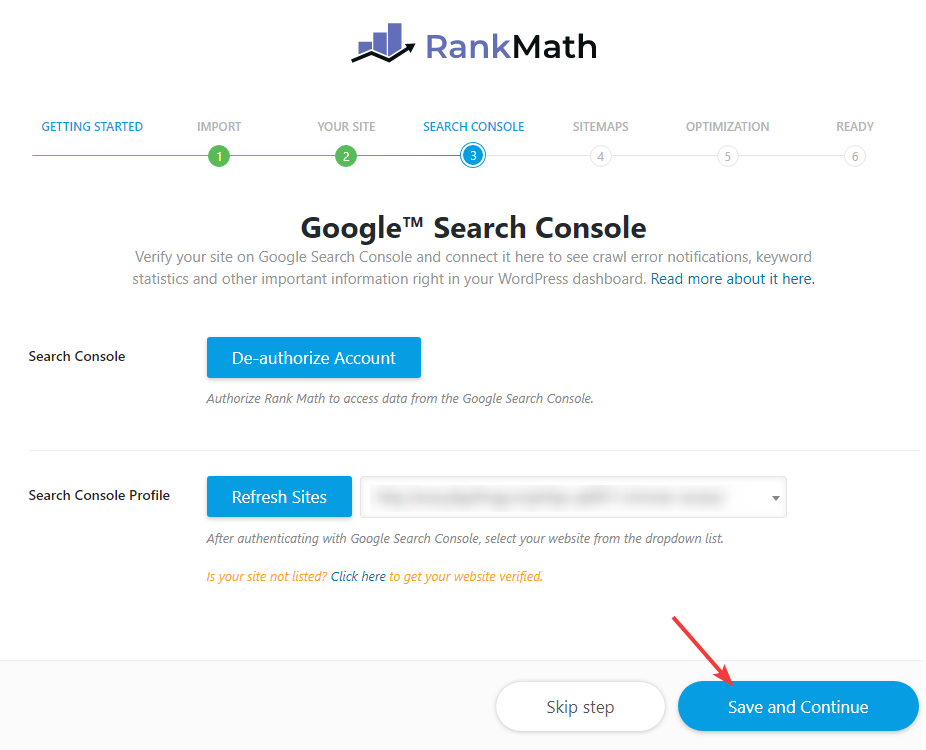 Click the Save and Continue button to proceed to the next step.
The next step is to select the appropriate Search Console Property in the Search Console Profile setting. Before proceeding, there are a few things you should understand.
First, Google Search Console will only display information about your website after you’ve verified that you own the website. If your website is not verified, then it will not be shown here. We will also discuss how to get your website verified in the next few steps.
Second, Google Search Console gathers data on individual properties. A property might be a website or even an individual page on your website.
When you click the Search Console Profile drop-down, you will see all your properties in the list. Select your website from the drop-down. If you have multiple properties, you can type in a few keywords, and the list will be filtered based.
If you can’t see your property, verify that you’ve connected the right Google Account with Search Console. If you have, then it would be a good idea to hit the “Refresh Sites” button and try once again.
That’s the end of the third step. Once you’ve completed it, your page should look something like this.
Click the Save and Continue button to proceed to the next step.
Step 4 – Sitemaps
The fourth setting has to do with Sitemaps. Sitemaps are like indexes for search engines, and they help search engines discover your website’s content and index it properly. On this page, we will configure the various sitemap options. Here is a preview of all the options available.
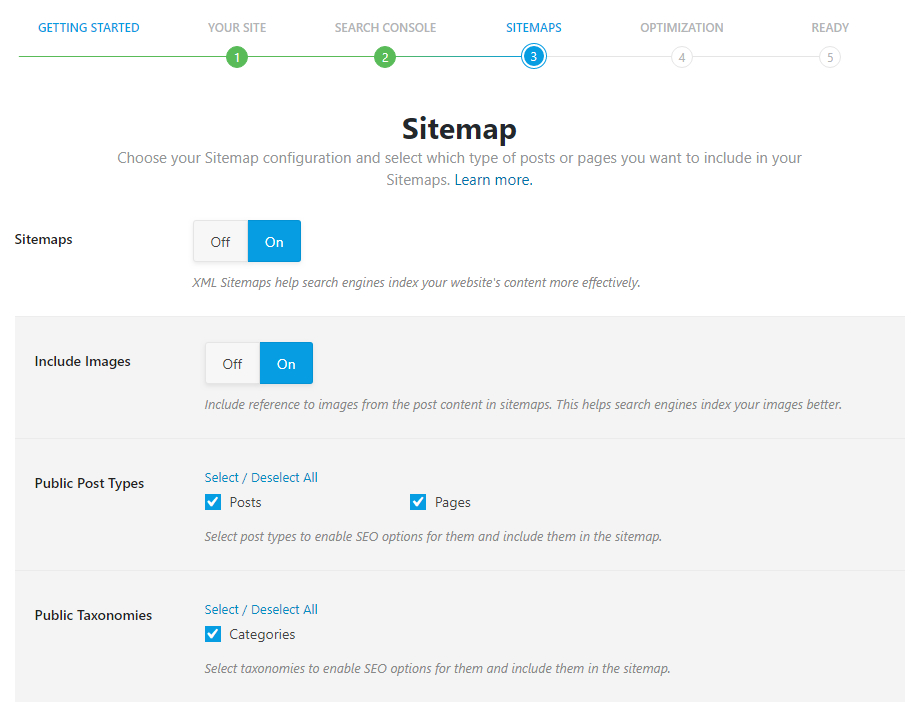
The fourth setting has to do with Sitemaps. Sitemaps are like indexes for search engines, and they help search engines discover your website’s content and index it properly. On this page, we will configure the various sitemap options. Here is a preview of all the options available.
Sitemaps
This option turns the sitemap feature ON or OFF. The sitemap feature is turned on by default, and we recommend that you keep it that way. If you have other plugins that generate sitemaps, we recommend that you disable them. It is inefficient to keep 2 plugins active that do the same job.

This option turns the sitemap feature ON or OFF. The sitemap feature is turned on by default, and we recommend that you keep it that way. If you have other plugins that generate sitemaps, we recommend that you disable them. It is inefficient to keep 2 plugins active that do the same job.
Include Images
This option enables or disables the inclusion of images in your sitemap. This setting is turned On by default, and we recommend that you keep it that way as well. Indexing your website images will help you get more traffic from Google Image search.

This option enables or disables the inclusion of images in your sitemap. This setting is turned On by default, and we recommend that you keep it that way as well. Indexing your website images will help you get more traffic from Google Image search.
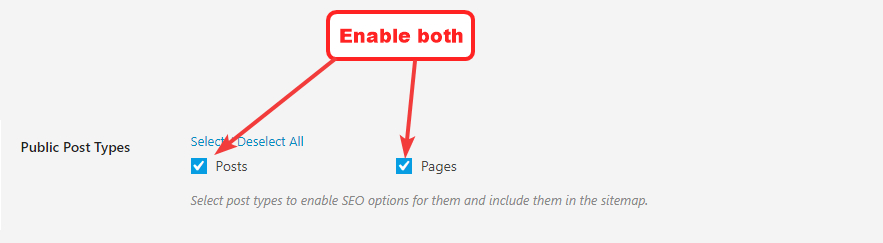
Public Post Types
This option controls which types of posts are going to be included in the sitemap. There are 2 options to choose from.
- Posts: Should be enabled; otherwise your posts will not be indexed.
- Pages: Enable this setting only if have some content on your website published on pages. You can leave it disabled if you only have simple pages like About Us, Contact Us, etc.
Please note that more options will be displayed in this section based on the type of posts you have on your website. For example, if you have WooCommerce installed, then you’ll see a “Products” option here.
Public Taxonomies
This option deals with the inclusion of taxonomies in the sitemap. The options you see here will depend on the number of taxonomies that you have created on your website.
 Once you’ve configured the settings to your needs, press the “Save and Continue” button to move onto the next step.
This option deals with the inclusion of taxonomies in the sitemap. The options you see here will depend on the number of taxonomies that you have created on your website.
Once you’ve configured the settings to your needs, press the “Save and Continue” button to move onto the next step.
Step 5 – Optimization
In this step, you are going to enable simple tweaks for your website that make a big impact. Here are all the options that appear on the screen.
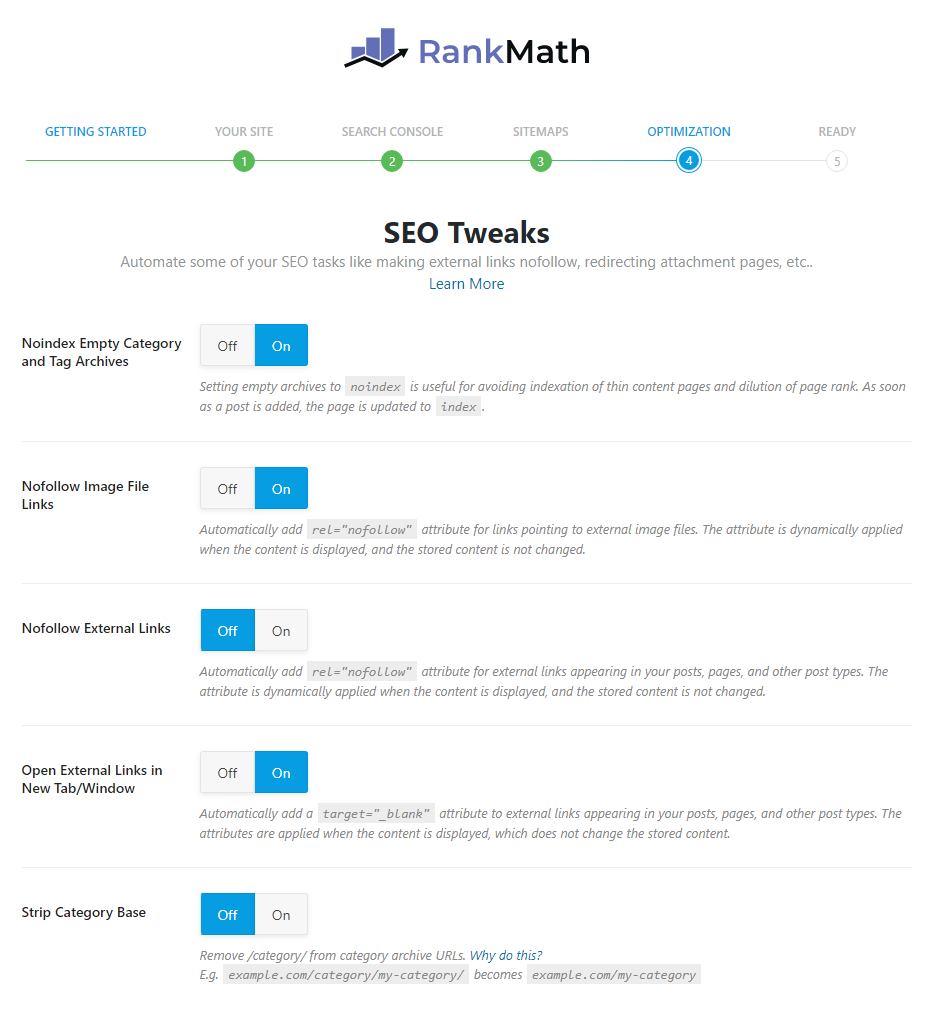
In this step, you are going to enable simple tweaks for your website that make a big impact. Here are all the options that appear on the screen.
Noindex Empty Category and Tag Archives
Many times you add many categories and tags to your website hoping to use them in the future, but they don’t get used at all. In WordPress, each category, taxonomy, and tag has an archive page—which is a collection of all the posts in that taxonomy.
By default, these archive pages are indexed, which is fine. But, for the categories and tags that do not have any posts, having them indexed is a waste of Page Rank.
This option, when enabled, automatically “no-indexes” the categories and tags that do not have any posts in them, thus saving your SEO juice. We recommend that you enable this setting.
Nofollow Image File Links
When you add images on your website, you can also add hyperlinks to it. That means your users can click the image and be taken to another URL. This option lets you configure if you want to Nofollow all image links.
If you mostly add images that point to your internal posts, then you can disable it. But, if you run an affiliate or niche site where most images links are external, then you should enable it.
Nofollow External Links
Normally, you can nofollow any link by adding the rel= "nofollow" attribute to it by using WordPress’s link manager. But, if you’re adding a lot of links to your posts, nofollowing them individually can be time-consuming. Enabling this setting will make all external links nofollow by default, and you can then remove the nofollow tag from the links you want to be followed. We recommend that you enable this setting.

Normally, you can nofollow any link by adding the
rel= "nofollow" attribute to it by using WordPress’s link manager. But, if you’re adding a lot of links to your posts, nofollowing them individually can be time-consuming. Enabling this setting will make all external links nofollow by default, and you can then remove the nofollow tag from the links you want to be followed. We recommend that you enable this setting.Open External Links New Tab/Window
It’s generally a good practice to have external links open in new tabs by appending the target=" _blank " to the link. Rank Math can automatically perform this for all external links with this setting. The setting is On by default, and we recommend that you keep it that way.

It’s generally a good practice to have external links open in new tabs by appending the
target=" _blank " to the link. Rank Math can automatically perform this for all external links with this setting. The setting is On by default, and we recommend that you keep it that way.Strip Category Base
WordPress pages usually have a category base attached to them. For example, a regular URL would look like this:
" mywebsite.com/reviews/product-review/”
Where “reviews” is the category name. To make your URLs cleaner, you can use this setting to strip the category name from the URLs. If you turn on the setting, the URL will become:
" mywebsite.com/product-review/”
There are no rules on whether you should strip the category base or not, but it is generally better to do so as your website URLs become cleaner. The only exception is when your website has multiple categories and tons of posts in each category—similar to an eCommerce store. In that case, it might be better to not strip the category base.
 Once you’ve configured all the settings in this step, here is how the screen should look like. Click the “Save and Continue” button to proceed to the next step.
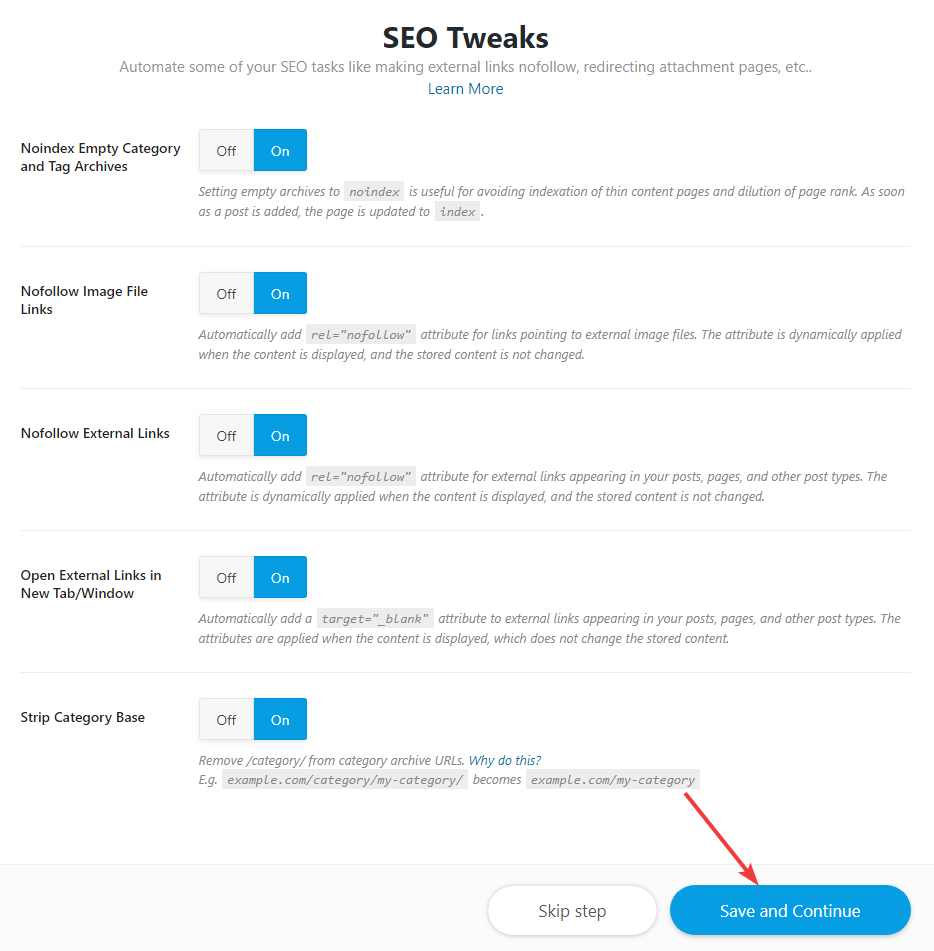
WordPress pages usually have a category base attached to them. For example, a regular URL would look like this:
" mywebsite.com/reviews/product-review/”
Where “reviews” is the category name. To make your URLs cleaner, you can use this setting to strip the category name from the URLs. If you turn on the setting, the URL will become:
" mywebsite.com/product-review/”
There are no rules on whether you should strip the category base or not, but it is generally better to do so as your website URLs become cleaner. The only exception is when your website has multiple categories and tons of posts in each category—similar to an eCommerce store. In that case, it might be better to not strip the category base.
Once you’ve configured all the settings in this step, here is how the screen should look like. Click the “Save and Continue” button to proceed to the next step.
Step 6 – Showing off Your Optimized Website
Congratulations. By following all the steps in this tutorial, not only have you successfully imported your current plugins’ settings, but you also have set up your website for SEO success. Take some time to show off your website’s prowess.
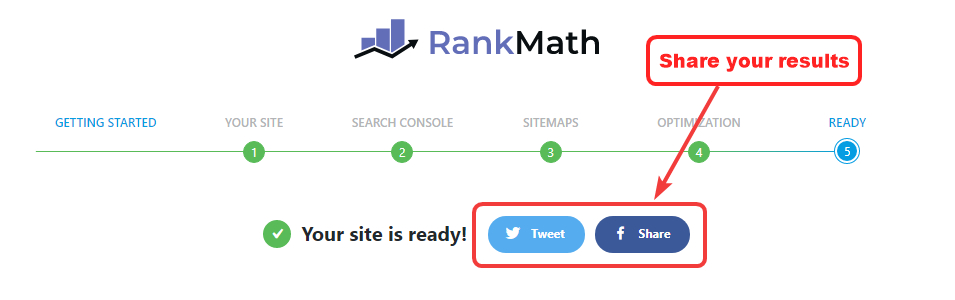 Once you do share your amazing results, take some time to join our Free Facebook Group where we provide support, give out SEO tips, and conduct some giveaways. Also, check out the other helpful links we’ve provided on the page.
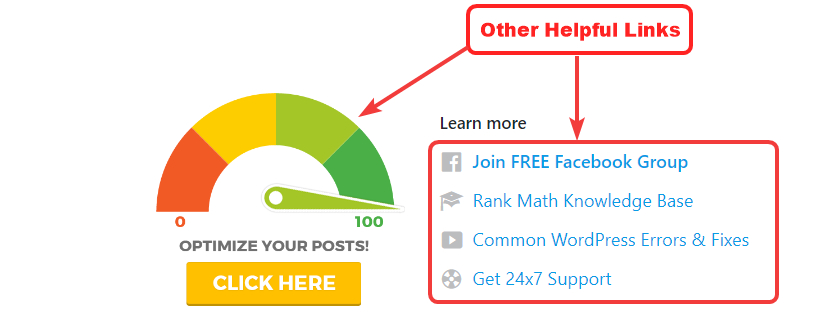
Congratulations. By following all the steps in this tutorial, not only have you successfully imported your current plugins’ settings, but you also have set up your website for SEO success. Take some time to show off your website’s prowess.
Once you do share your amazing results, take some time to join our Free Facebook Group where we provide support, give out SEO tips, and conduct some giveaways. Also, check out the other helpful links we’ve provided on the page.
Subscribe to:
Posts (Atom)
-
How to create a free online course website with WordPress in 2019 In this video, I'm going to show you how to create an online course...
-
How To Create Own Chrome Extensions using ChatGPT | Chrome Extensions Development In this tutorial, you'll learn how to create a Chrome...
-
Privacy Policy Minzor built the 3d wallpapers app as a Free app. This SERVICE is provided by Minzor at no cost and is intended for use as is...
